Install VM
In this course, we are using Ubuntu 20.04 LTS and ROS2 Foxy as development tools. We will talk about what these tools mean later but for now you just need to know that these are not regular programs which you simply write the name in Microsoft Store (or App Store) and get. Therefore, we are using virtual machines.
Virtual machines are basically some software which run just like a regular PC but without any physical components. They use the host's hardware equipments as a guest. Since ROS works best on Linux based operating systems but we assume most of you have Windows PCs, we provide this ready-to-use solution for you to start ROS as smooth as possible.
There will be two components:
- The virtual appliance (the file you open in a virtual machine player)
- A software to run the virtual appliance (VMware)
The admin password inside the virtual appliance is: student
Virtual Appliance
A virtual appliance is a copy of a working operating system and its
programs. We provide you ready-to-use virtual copy of what you need. To
download it, use this link
with your HVL credentials. After downloading, Windows users must extract the folder inside the .zip file. For MacOS users, the file will be a .vmwarevm which can directly be opened in VMware Fusion.
Virtual appliances are usually big files, so we recommend you make space on your hard drive before downloading. The virtual appliance is about max 20 GB in size.
NB: if downloading from OneDrive and unzipping doesn’t work, here are some back up links:
Virtual Appliance Player
A virtual appliance player is a piece of software on which you can run your virtual appliance (aka. a virtual copy of a system). We suggest you download VMware for this purpose.
VMware Install
Option 1
If you use Windows, try this link first. At the installation step, it will ask if you want to install Windows Hypervisior, do not install it. Afterwards, select “enable enhanced keyboard” option. Follow the regular installation gut feelings and you are done.
Option 2
If the link above didn’t work, or you are using Linux/Mac, to install VMware, you need to go to create an account at Broadcom.com
Please use only international characters to while you enter your name and adress
After the registration is completed, login to your account and click to the correct link below that is compatible to your PC.
- For Windows/Linux: VMware Workstation Pro 17 (or a higher version)
- For Mac: VMware Fusion 13
Video tutorial for installation is here. Installation tutorial is for Windows. You can use “Virtual Disk.vmdk” file instead for Mac.
Running VMware
Windows
After installing it you should import the virtual appliance in the VMware Player/Workstation. Start VMWare > click File > Scan for Virtual Machines > Browse to where your virtual appliance folder is (Ubuntu_20_02_foxy). The VMware workstation will find import the appliance automatically.
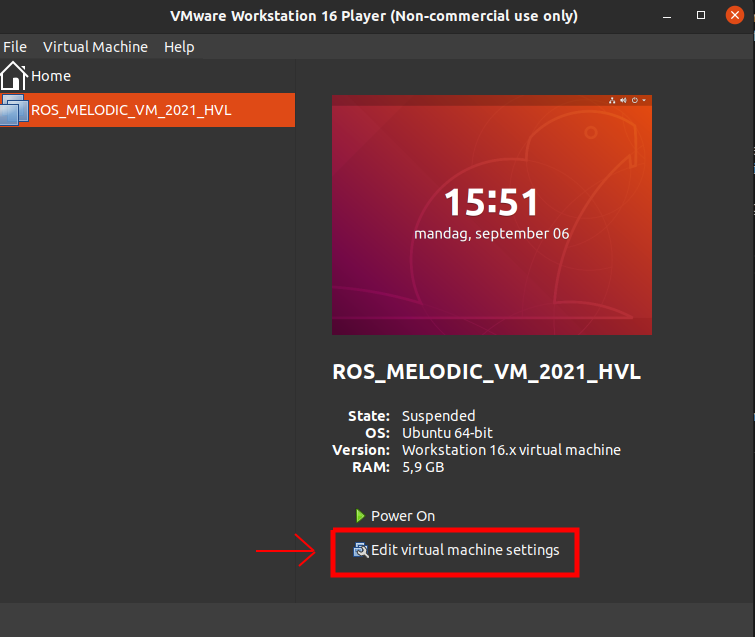
After you finished importing the virtual appliance, go to Edit virtual machine settings and in Display settings and make sure that Accelerate 3D graphics is enabled and choose recommended Graphics Memory from the dropdown box as shown in the pictures. Based on your version of VMware, the images might be slightly different.
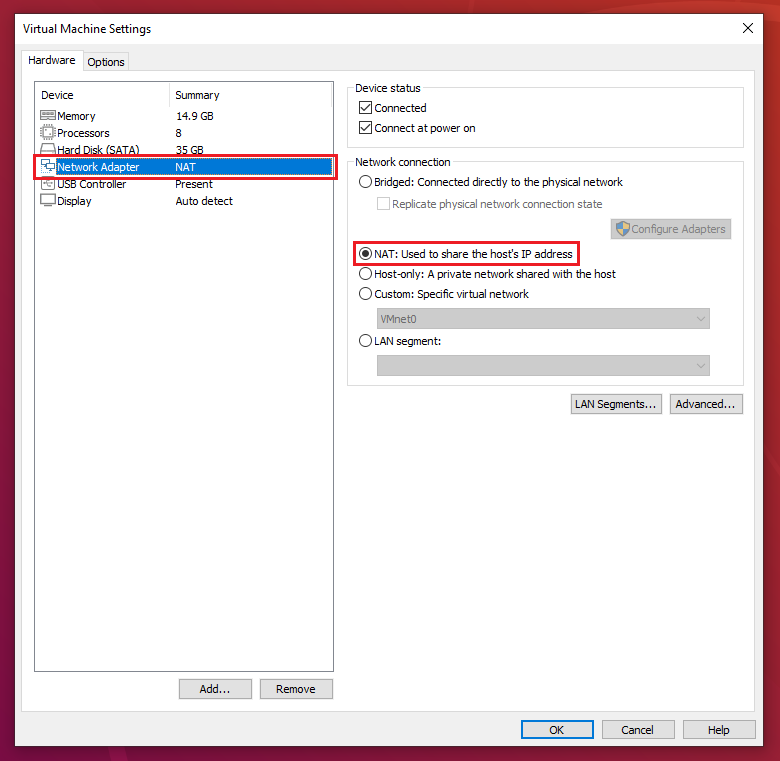
Also make sure, that in the Network Adapter settings, under Network connection, NAT is selected, as shown in the pictures below.
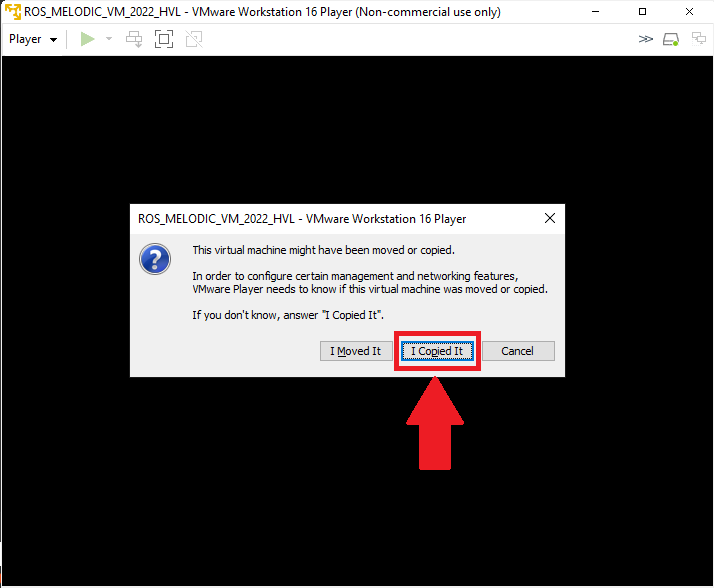
When first opening the virtual machine, the following window will pop-up. Select I Copied It to continue.
Quick reminder, the admin password inside the virtual appliance is: student.
MacOS
After installing VMWare you can either open the .vmwarevm through the “Open” option in the VMware Fusion, or you can double click the .vmwarevm file and it will automatically open in VMware Fusion.
When first opening the virtual machine, a window will pop-up. Select I Copied It to continue.
Close the virtual machine and go to Virtual Machine > Settings and in “Display settings” and make sure that Accelerate 3D graphics is enabled. In the “Network Adapter” settings, make sure that Connect Network Adapter is enabled and “Share with my mac” is selected.
You are now ready to start the virtual machine. Quick reminder, the admin password inside the virtual appliance is: student.
Troubleshooting
Unpacking/Unzipping the virtual appliance does not work (MacOS)
Large files from OneDrive (>4GB) are encoded in a way that the default MacOS unzipping tool cannot handle. The easiest way to solve this issue is to use this perl script to correct the field that is causing the error:
- clone the repository:
git clone https://github.com/pmqs/Fix-OneDrive-Zipor download as a zip file and extract it - run the script:
perl fix-onedrive-zip <path-to-your-zip-file>in the terminal - unzip the fixed zip file by double clicking it or using the command line:
unzip <path-to-your-fixed-zip-file>
You should now be able to open the virtual appliance in VMware Fusion (.vmwarevm file).
Copy-paste doesn’t work
Option-1
First try VM tools auto update:
- Start VMware.
- Select the virtual appliance Ubuntu20_04_foxy BUT DON’T RUN YET.
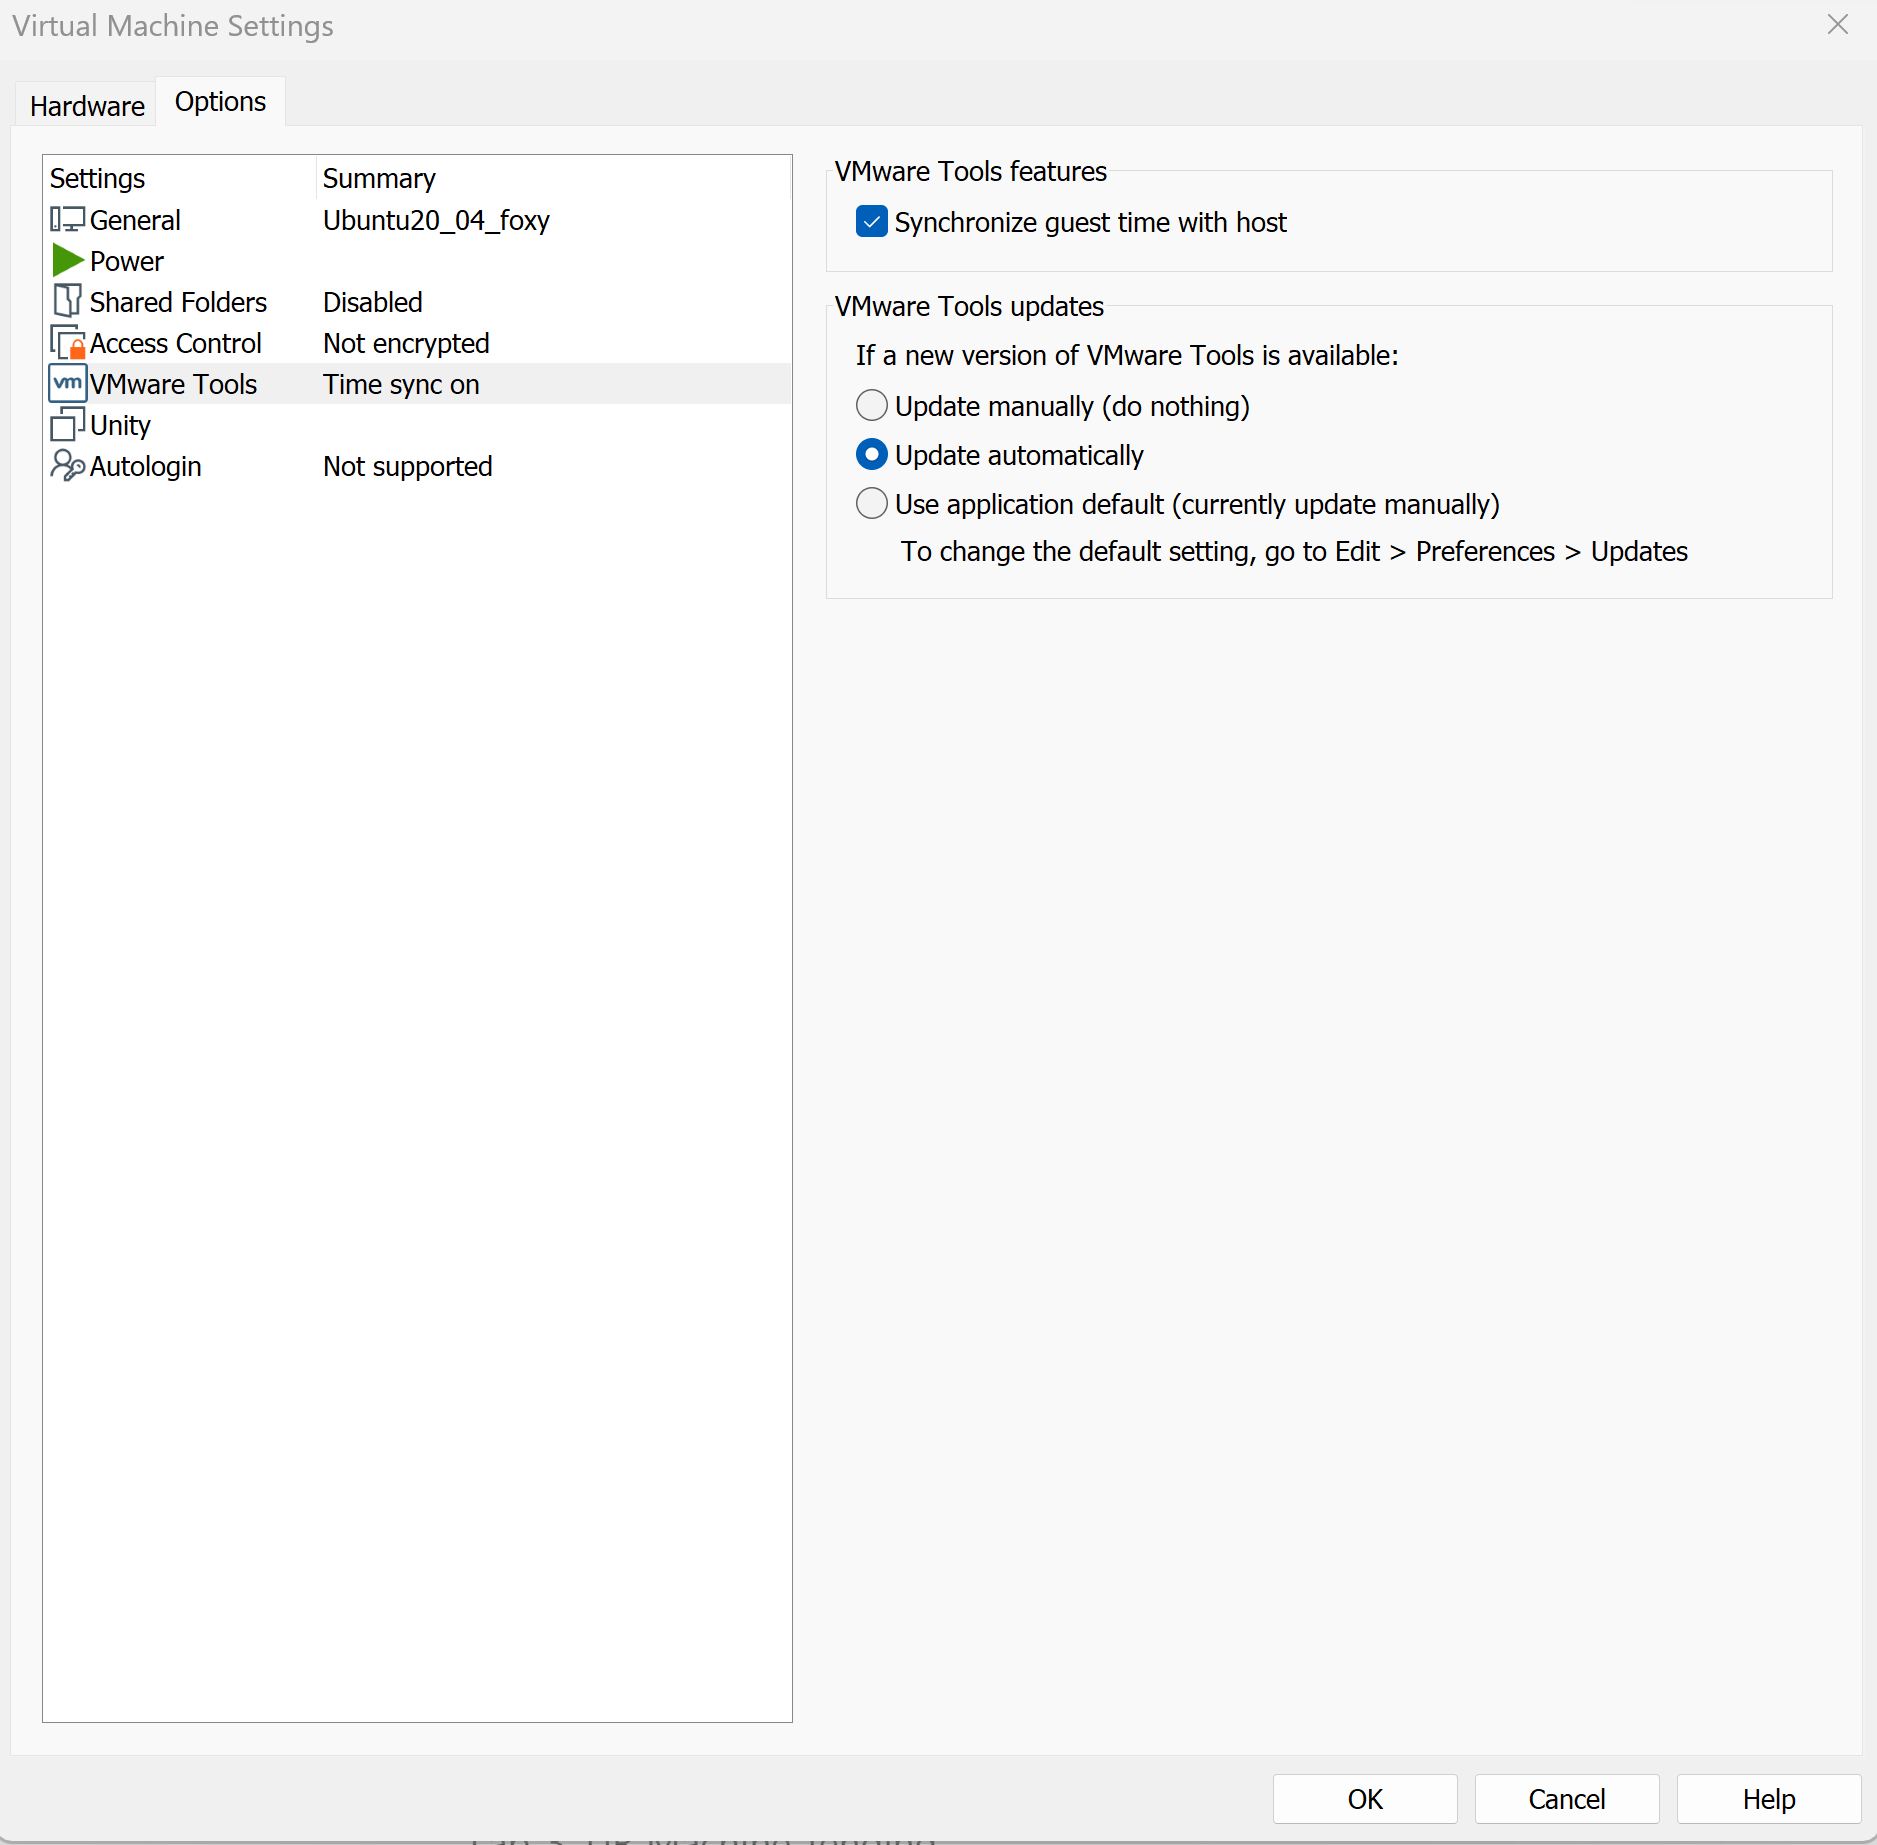
- Edit virtual machine settings > Options > VMware tools.
- Select update automatically and click Synchronize guest time with host.
Option-2
Try this if option-1 does not work.
- Start your virtual machine.
- Open a terminal: Ctrl + Alt + T
- Run these commands:
sudo apt update
sudo apt upgrade
sudo apt autoremove
sudo apt-get install --reinstall open-vm-tools-desktop -y
and now restart the VMware.
You might still experience errors in copy-paste’ing folders. Then just click “Skip all”. It will successfully copy-paste, nonetheless.
Option-3
This won’t solve your issue if you can’t copy a simple text between your host and guest, but it may solve if you can’t copy FOLDERS. Try using shared folders. First create a folder on Windows (or whatever host you have). Easiest is to create a “VMtest” folder on Desktop. The rest of the steps are on the VM.
- Go to the top menu of VMware and click VM > Settings.
- Go to the Options tab and select Shared Folders.
- Select your share and click Properties. Select “Always enabled”.
- Set the Host Path to exactly to the folder you created on Desktop/VMtest and COPY THE PATH AFTERWARDS.
- Name the share: VMtest
- Click OK to save and close the settings window.
- Open a new terminal
Ctrl+Alt+T. Create a mount folder:sudo mkdir -p /mnt/hgfs - Fuse to this folder
sudo vmhgfs-fuse .host:/YOUR-COPIED-PATH /mnt/hgfs -o allow_other. Don’t forget to modify the path to yours. - Verify the files are visible:
ls -l /mnt/hgfs - Test if everything is fine:
vmware-hgfsclient. If it returns nothing: VMware’s host side is not sending the folder to the virtual machine. Shut down the VM, remove the shared folder from settings, re-add it, and make sure it points to right folders and that you modified the paths correctly. Firstsudo umount /mnt/hgfsand thensudo mount /mnt/hgfsagain. - If everything goes fine you should see the changes you do in the folder
/mnt/hgfsin your Windows Desktop VMTest folder. - To copy files/folders use this command on your Linux terminal: First go to
cd /mnt/hgfsand thencp -r PATH_TO-FOLDER-TOBE-COPIED .(The dot in the end means “here” in Linux).
Network is not working
Despite all the settings being correct, your VM seams to simply not have a network adapter? Or you can’t see anything in the wifi and network setting except proxy? Then this command in the terminal of the VM might help you:
sudo nmcli networking on
VMware freezes
It might be about the hardware resource usage of your host PC. You can try:
- Edit virtual machione settings > and reduce the number of cores to 4, and ram to 4 GB as well.
- Update the VMware tools: After starting your Ubuntu VM, open a new terminal and run these:
sudo apt update sudo apt upgrade sudo apt install -y open-vm-tools open-vm-tools-desktop sudo reboot now - Try another VM player. If you are running on version 17, just try 16 or 25. It will not affect what you have already done in your Ubuntu guest. You can change the VM Player/Workstation version anytime you want!
Matlab ROS Toolbox
As you will see later in this course, you can control and communicate with robots in ROS using Matlab, even if the MAtlab is running on your host PC and ROS is running in your virtual machine. For this, you will need Matlab installed of course, but not any version! To be able to communicate with ROS2 Foxy, you will need Matlab R2022a to R2024b (not older, not newer). You will also need to have MATLAB ROS Toolbox installed on your host PC. Please make sure that you have the toolbox installed: Home > Add-Ons > Manage Add-Ons.
Standalone installation
For those who don’t use the given virtual copy and choose to install the necessary software and packages by themselves use the following links: Ubuntu 20.04 LTS, ROS2 Foxy, Necessary Turtlebot packages and some more libraries. Please contact the course instructor if you choose to make a standalone installation, a list of requirements will be provided to you. But we cannot guarantee that it will work since we won’t have time to fully test your installation.