Qt libraries with ROS
Installation
This is a tutorial for installation of Qt 5.7.0 to Ubuntu 20.04. It may be used for some newer versions of Qt and Ubuntu.
- Install Qt 5:
sudo apt install build-essential qtcreator qt5-default qtbase5-examples - Install Qt to Python converter:
sudo apt install pyqt5-dev-tools
If error: g++: Command not found:
sudo apt-get purge build-essential
sudo apt-get install build-essential
If error: GL/gl.h: No such file or directory
sudo apt-get install mesa-common-dev
Tutorial start
In this tutorial, we will create a GUI package and interact with ROS nodes and messages via this package.
Create a ROS package
Since in this tutorial our aim is to use the Qt libraries together with ROS, we will have eveything in our ros2_ws. However, please remember that you don’t need to have ROS to use the Qt libraries in any Python script. For the sake of the tutorial, we will learn the usage of Qt in a ROS scenario - but the steps would be the same for another scenarios, as well.
You need to have your files in your ros2_ws. Therefore, we start by creating a new ROS package for this tutorial.
cd ~/ros2_ws/src
ros2 pkg create --build-type ament_python --node-name my_gui_pkg my_gui_pkg
cd ..
colcon build
cd ~/ros2_ws/src/my_gui_pkg
mkdir ui
Design your widget/app
- Open Qt Designer
- Select Widget and default screen size
- Press create
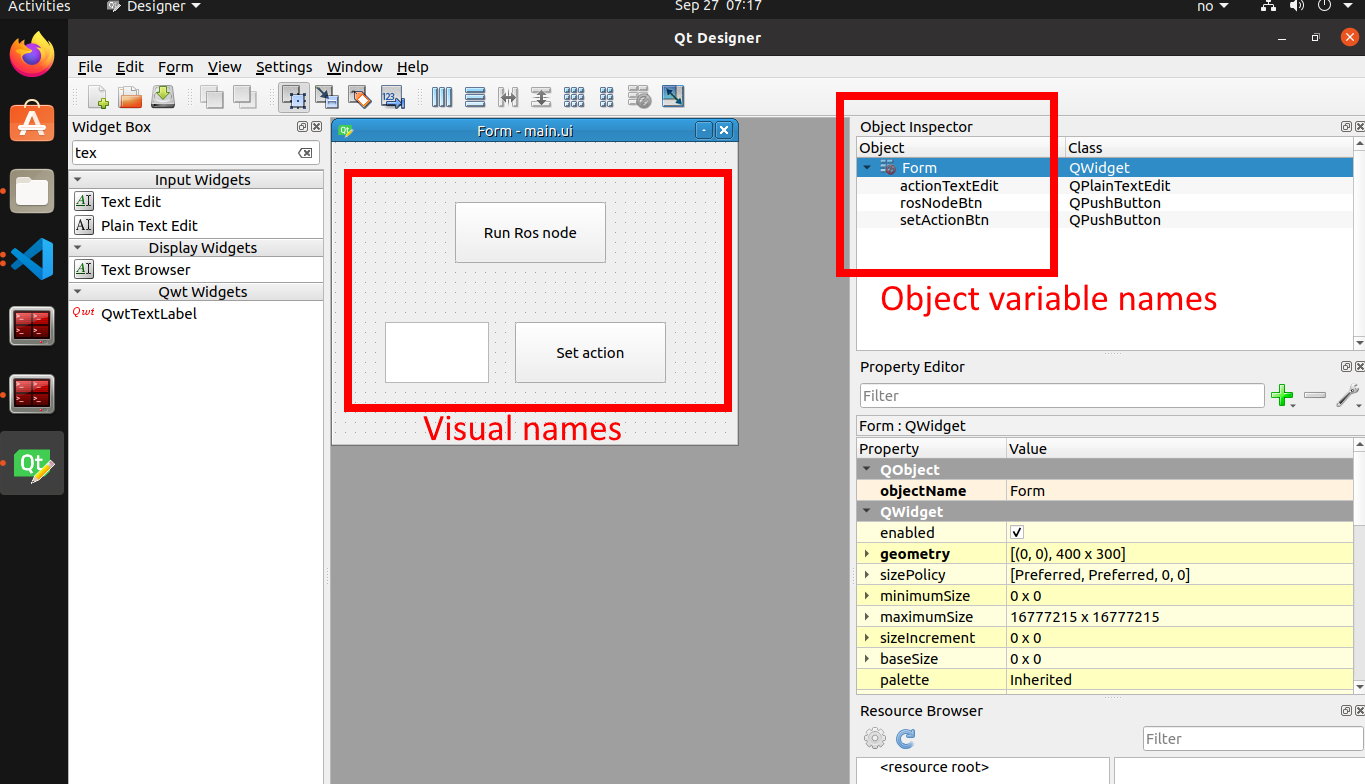
- Select two “Push Button”s and one “Plain Text Edit”, and place them somewhere in the Widget window.
- Change their name something nice, and give a representative class names.
- Save by hitting Ctrl+s
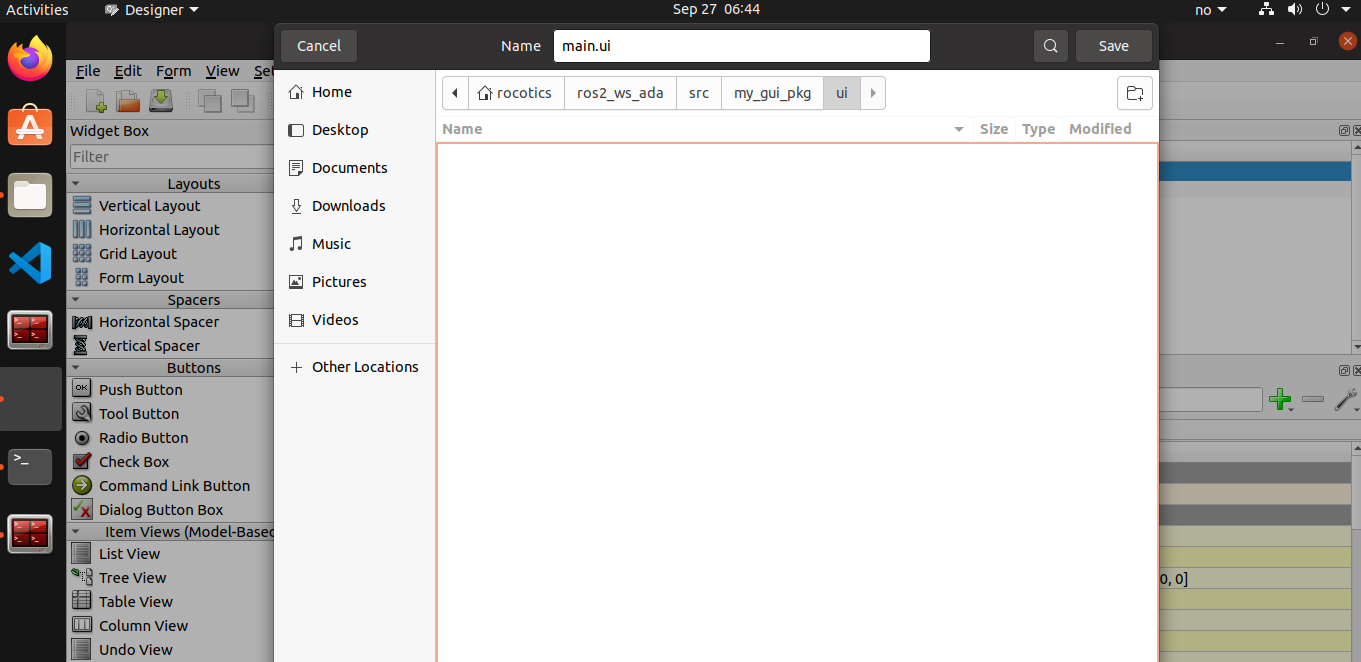
- Select the “ui” folder in your ROS package.
- Change the file name to “main.ui”
Connecting UI and ROS
There are three steps:
- Converting UI to Python script.
- We will create (or copy) a publisher for test purposes. We will start this publisher with “Run ROS node” button.
- (Maybe) We will set a value a for an action with “Set action” button by reading from the plain text edit.
Converting UI to Python script
Go to the direction where your “main.ui” is:
cd ~/ros2_ws/src/my_gui_pkg/ui
Convert the UI file into a Python file:
pyuic5 -x main.ui -o main.py
Note that whenever you change something in your design, you must convert it into the Python file.
Open VS code and find your package in the explorer.
Add this line at the top: #!/usr/bin/env python3. At this point, if you run the script via VS code, you should see your widget app :)
Move your main.py into my_gui_pkg/my_gui_pkg, where you would normally place all your ROS nodes.
Since main.py is a simple Python class, we can just import it like this: from main import Ui_Form as Main_Widget. To do that, we will use my_gui_pkg.py. Copy the codes below in my_gui_pkg.py.
from PyQt5 import QtCore, QtGui, QtWidgets
from PyQt5.QtGui import *
from PyQt5.QtWidgets import *
from PyQt5.QtCore import *

import sys, os
import subprocess, signal
import time
I know there seem to be redundant imports but I find it easier to use it like that. Feel free to optimize it if it hurts your brain.
Since we don’t want to modify the code that is generated by the pyuc5, we will actually make a subclass from what we have in main.py. It will look like this:
class GUI_Window(QWidget, Main_Widget):
    def __init__(self, parent=None):
        super(GUI_Window, self).__init__(parent)
        self.setupUi(self)
        # self.resize(854, 480)
        self.setWindowTitle("My GUI app")
        self.show()
And finally we will add these lines so that we can run the script as we press the play button.
if __name__ == '__main__':
    app = QApplication(sys.argv)
    w = GUI_Window()
    sys.exit(app.exec_())
Creating necessary nodes:
You can use any ROS node for this step. I will just copy paste my_publisher.py from the previous tutorials into my_gui_pkg/my_gui_pkg. It is a simple hello world publisher. Make sure that you do the necessary changes in setup.py. If you don’t remember check Creating the publisher tutorial.
We need to create a function that will start a subprocess of ros2 run my_gui_pkg my_publisher. Additionally, we need to connect this function with our button click. To do that we need this code inside the class constructor after self.setWindowTitle("My GUI app") in main.py
self.rosNodeBtn.clicked.connect(self.start_ros_node)
self.my_publisher_proc = None
The self.rosNodeBtn is the object taken from our UI class. You can reach each object in your UI like this.
Now it is time to define the function. Copy the code after the class constructior and before if __name__ == __main__:
def start_ros_node(self):
    if self.my_publisher_proc == None: # because you don't want to start several processes in each click
        self.my_publisher_proc = subprocess.Popen(["ros2", "run", "my_gui_pkg", "my_publisher"], text=True)
    else:
        print("The node is already exist")
Pay attention how similar subprocess.Popen syntax with the regular terminal command.
You will experince lots of simultaneously running processes of the same type. You need to pay attention that you actually kill the ROS node process as you press exit button.
    def kill_processes(self):
        # This is to kill rosnodes as you close the windiw
        try:
            os.killpg(os.getpgid(self.my_publisher_proc.pid), signal.SIGINT)
            print("Sent SIGINT to ROS node")
        except Exception as e:
            print(e)

    def closeEvent(self, event):
        print("Window closing...")
        self.kill_processes()
        time.sleep(0.5)
        event.accept() # let the window close
Don’t forget to colcon build before you test it. Otherwise, you will get the error No executable found.
Setting an action with the text edit data
The method with subprocess is easy, rather clean and effective. However, sometimes you want to interact the data that you have an access through the UI. You can very well set a ROS parameter with this data before you start the relevant node, and use this ROS parameter inside this node.
But I have a better idea. We will use service and client!
Let’s create a custom service based on this tutorial.
cd ros2_ws/src
ros2 pkg create --build-type ament_cmake motor_srvcli
mkdir srv
Create Motor.srv and put these in it:
int64 goal_pos
---
bool result
Add these in CMakeLists.txt
find_package(geometry_msgs REQUIRED)
find_package(rosidl_default_generators REQUIRED)

rosidl_generate_interfaces(${PROJECT_NAME}
  "srv/Motor.srv"
  DEPENDENCIES geometry_msgs # Add packages that above messages depend on, in this case geometry_msgs for Sphere.msg
)
Add these in package.xml:
  <depend>geometry_msgs</depend>
  <buildtool_depend>rosidl_default_generators</buildtool_depend>
  <exec_depend>rosidl_default_runtime</exec_depend>
  <member_of_group>rosidl_interface_packages</member_of_group>
Build and source.
Make sure that your service is available by running this: ros2 interface show motor_srvcli/srv/Motor
Now add a service and client members in the package that you want to use these. For more info, you can refer this tutorial. Here we will use our Qt package my_gui_pkg. Go ahead and create two files: client_member_function.py and service_member_function.py. Client is the one sending the request, service is the one returning the response.
my_gui_pgk/my_gui_pkg/client_member_function.py
import sys

from motor_srvcli.srv import Motor
import rclpy
from rclpy.node import Node


class MinimalClientAsync(Node):

    def __init__(self):
        super().__init__('minimal_client_async')
        self.cli = self.create_client(Motor, 'motor')
        while not self.cli.wait_for_service(timeout_sec=1.0):
            self.get_logger().info('service not available, waiting again...')
        self.req = Motor.Request()

    def send_request(self, goal_pos):
        self.req.goal_pos = goal_pos
        self.future = self.cli.call_async(self.req)
        rclpy.spin_until_future_complete(self, self.future)
        return self.future.result()


def main(args=None):
    rclpy.init(args=args)

    if len(sys.argv) < 3:
        print("Usage: ros2 run my_gui_pkg client <goal_pos:int> <complete_flag:0|1>")
        return

    minimal_client = MinimalClientAsync()
    response = minimal_client.send_request(int(sys.argv[1]))
    minimal_client.get_logger().info(
        'Received %d, Flag: %d' %
        (int(sys.argv[1]), response.complete_flag))

    minimal_client.destroy_node()
    rclpy.shutdown()


if __name__ == '__main__':
    main()
my_gui_pgk/my_gui_pkg/service_member_function.py
from motor_srvcli.srv import Motor

import rclpy
from rclpy.node import Node


class MinimalService(Node):

    def __init__(self):
        super().__init__('minimal_service')
        self.srv = self.create_service(Motor, 'motor', self.motor_callback)

    def motor_callback(self, request, response):
        response.complete_flag = True
        self.get_logger().info('Incoming request\ngoal_pos: %d complete_flag: %d' % (request.goal_pos, response.complete_flag))

        return response


def main(args=None):
    rclpy.init(args=args)

    minimal_service = MinimalService()

    rclpy.spin(minimal_service)

    rclpy.shutdown()


if __name__ == '__main__':
    main()
Update your setup.py.
entry_points={
        'console_scripts': [
            ...
            'service = my_gui_pkg.service_member_function:main',
            'client = my_gui_pkg.client_member_function:main'
        ],
    },
Build and source.
Run your service ros2 run my_gui_pkg service. This will wait for the client.
Run your client ros2 run my_gui_pkg client 250 1. This will make service to respond.
Now you can connect your motors in this code. First include your CustomDXL library from custom_dxl.CustomDXL import CustomDXL and add these in your constructor with the correct motor IDs:
    def __init__(self):
        super().__init__('minimal_service')
        self.srv = self.create_service(Motor, 'motor', self.motor_callback)
        self.custom_dxl = CustomDXL([0, 4])
        self.custom_dxl.open_port()
Afterwards, you can send goal in your motor_callback:
    def motor_callback(self, request, response):
        self.custom_dxl.send_single_goal(motor_order=1, goal_pos=request.goal_pos)
        response.complete_flag = True
        self.get_logger().info('Incoming request\ngoal_pos: %d complete_flag: %d' % (request.goal_pos, response.complete_flag))

        return response
If you call your client again, you should see that your motor rotates: ros2 run my_gui_pkg client 250 1
But the whole point was to send those things from our GUI, wasn’t it? Let’s update our main.py in my_gui_pkg then.
First, we don’t need to call the dummy publisher anymore. We can call our service.
self.my_publisher_proc = subprocess.Popen(["ros2", "run", "my_gui_pkg", "service"], text=True, preexec_fn=os.setsid)
And then, we can define a new functionality for our set action button. Add this into your __init__() consctructor:
## Set Action button
    self.msg_data = None
    self.setActionButton.clicked.connect(self.set_action)
    self.my_action_proc = None
So we have to create a new function that the button click tries to connect here:
def set_action(self):
    self.msg_data = self.actionTextEdit.toPlainText() # we read the data
    print(self.msg_data)
    subprocess.Popen(["ros2", "run", "my_gui_pkg", "client", str(self.msg_data), "1"], text=True, preexec_fn=os.setsid)
If you press play button, run the ros node, write a value between [0, 4095], and click set action, you will see that your motor moves!
Extra
While I was preparing this tutorial, I found some extra resources that might be helpful. I list them here: