ROS-ify Python Scripts
In this lecture, you will learn how to use custom Python libraries in your ROS package. We are going to ROS-ify some example Python scripts that you are already familiar with, which depends on the DynamixelSDK and adatools libraries.
How to import custom libraries
So far, you have been introduced to how to control Dynamixel robots using DynamixelSDK, how to plot different features of the robot using Robotics Toolbox. All are using libraries written in Python3.
On the other hand, recently, you have been introduced ROS. You know that you can use Python or C++ to program nodes and launches in ROS. Today, we are going to learn how to “ROS-ify” simple Python scripts such that you can implement your Python scripts into the ROS environment.
Let’s start by creating a new package.
- Open your favorite terminal: Ctrl+Alt+T
- Make sure that you are in the right directory:
cd ~/ros2_ws/src - Create a new package with a node:
ros2 pkg create --build-type ament_python --node-name send_single_joint_cmd rosify_dynamixel_ros_pkg - Direct to the workspace back:
cd .. - Compile the workspace:
colcon build --symlink-install - Source the workspace:
source install/setup.bash
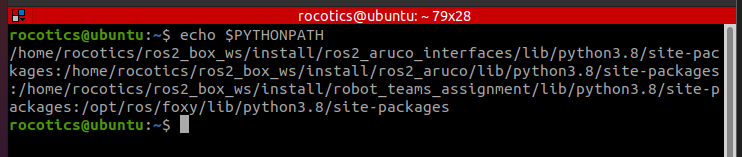
The ROS packages have to be under your ROS workspace. It is ~/ros2_ws in the virtual machine. This might cause an issue in the beginning for some manually installed Python packages that you want to use (i.e adatools). First, you need to import the Python path of the sensors, motors, visualizer scripts etc. libraries into your $PYTHONPATH. Otherwise, you will get ImportError or ModuleNotFoundError when you attempt to use those libraries.
Check your Python libraries path: echo $PYTHONPATH
You can do in manually every time, or package specify, but we will focus on a global solution since you may want to skip this step in future occasions.
Import adatools path
Check the path of your desired library, for example adatools. Browse to the folder location, open a new terminal, type pwd, note the directory. For my case:
>pwd
/home/rocotics/adatools
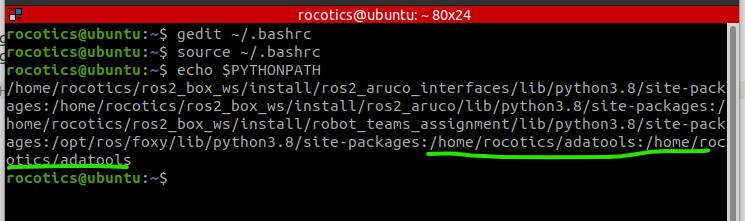
Add this line to your ~/.bashrc using your favorite text editor. »> export PYTHONPATH=”${PYTHONPATH}:/my/other/path”
For my case: export PYTHONPATH="${PYTHONPATH}:/home/rocotics/adatools"
Open a new terminal, or source .bashrc in your current terminal: source ~/.bashrc.
Check your Python libraries path again: echo $PYTHONPATH.
You should do this to every single library that is installed from source.
Sanity check
Create a dummy Python script in your ROS package and import your desired library:
import sys
#sys.path.append('/home/rocotics/adatools') # this is to add manually instead of export in .bashrc

from adatools import utils

print(utils.__file__)
Exercise: ROSify a Dynamixel script
Let’s ROSify a Dynamixel script. Our end goal at this step is to make a ROS node that subscribes to a simple user command in terms of a single joint command topic and controls the respective Dynamixel motor.
CustomDXL class
To make things easier, I am going to create a custom Dynamixel class. Here is the dummy version just to remember how to create custom classes in Python:
~/adatools/custom_dxl/CustomDXL.py
import dynamixel_sdk as dxl

class CustomDXL:
   def __init__(self,dxl_ids=[1, 2, 3]): # Put your motor IDs from Dynamixel SDK
      self.dxl_ids=dxl_ids
   def getIDs(self):
      return self.dxl_ids
~/adatools/examples/test.py
from custom_dxl.CustomDXL import CustomDXL

object_dxls = CustomDXL([0, 4]) # Put your motor IDs from Dynamixel SDK
print(f"IDs: {object_dxls.getIDs()}")
You can download the full version here rosify_dynamixel folder. Remember to change the port, baud_rate and motor IDs.
At this point, you should be able to control your motors if you copy-paste the content in test_CustomDXL.py into the node ~/ros2_ws/src/rosify_dynamixel_ros_pkg/rosify_dynamixel_ros_pkg/send_single_joint_cmd.py.
Use CustomDXL in a ROS node
In Publisher/Subscriber lesson, we have learned how a simple subscriber looks like. It will look like this when we add CustomDXL library into send_single_joint_cmd.py:
~/ros2_ws/src/rosify_dynamixel_ros_pkg/rosify_dynamixel_ros_pkg/send_single_joint_command.py
#!/usr/bin/env python3

import rclpy
from rclpy.node import Node

from custom_dxl.CustomDXL import CustomDXL

#TODO
IMPORT NECESSARY MESSAGE LIBRARIES

class myDynamixelController(Node):
    def __init__(self) -> None:
        super().__init__("my_dynamixel_controller")
        #TODO
        self.sub = self.create_subscription(MSG_TYPE, 'TOPIC_NAME', self.listener_callback, 10)
        self.dxls = CustomDXL(dxl_ids=[0, 4]) ## TODO set your own dynamixel motor IDs
        self.dxls.open_port()
        self.dxls.send_goal(goal_pos=[1000, 2000]) ## TODO Adjust position commands according to your motors, give a list of all joints.
        print("Created")

    def listener_callback(self, msg):
        #TODO
        # listen to the message,
        # set it to the respective motor
        pass

def main(args=None):
    rclpy.init(args=args)
    node = myDynamixelController()
    rclpy.spin(node)

    rclpy.shutdown()

if __name__ == '__main__':
    main()
Remember different message types. This is something you need to choose based on the data that you want to provide to ROS in terms of sensor publisher or that you get from ROS in terms of actuator commands. We will use std_msgs/Int32 Message in this exercise.
Your turn:
Imagine a topic /dxl_joint_cmd (Int32) is supposed control the first joint of your robot. Can you modify the code such that you will subscribe to this topic and actuate your motor accordingly?
Hint:
- Use
rqt_publisherto publish/dxl_joint_cmd. - Update joint value every second.
Visualize
From plot_base_plate example, we know how to visualize our custom robot. You can also rosify this.
Create a new node called visualize_dxl.py in your package.
For those who already modified the adatools.config_generator library, you can use your version and modify the following code. I have modified it such that created a new function for a 2-DOF model. Therefore, the visualize_dxl.py looks like this for me:
~/ros2_ws/src/rosify_dynamixel_ros_pkg/rosify_dynamixel_ros_pkg/visualize_dxl.py
#!/usr/bin/env python3

from adatools import config_generator as cg
from adatools import plotting_tools as pt


my_conf2_robot = cg.get_robot_config_2(link1=0.3, link1_offset=0.0,
                                       link2=0.3, link2_offset=0.0)

# Plot the robot on base plate
robot_plot = my_conf2_robot.plot(my_conf2_robot.q, backend='pyplot')
pt.plot_baseplate(robot_plot)
# robot_plot.hold()

# Jog the robot on base plate
robot_teach = my_conf2_robot.teach(my_conf2_robot.q, backend='pyplot', block=False)
pt.plot_baseplate(robot_teach)
robot_teach.hold()
It is still a simple Python script, not a ROS node yet. Therefore, ros2 run ... does not work yet. You can test it with the following command: python3 visualize_dxl.py (run this command in the path where visualize_dxl.py is located).
Rosify visualize_dxl.py
First, add visualize_dxl.py in setup.py.
Second, modify the command such that it subscribes to the same topic as in the send_single_joint_cmd.py, which is /dxl_joint_cmd, and plots the value in this topic for the first joint.
#!/usr/bin/env python3

from adatools import config_generator as cg
from adatools import plotting_tools as pt
from math import radians as d2r

#TODO: Add necessary ROS libraries


class myDynamixelVisualizer(Node):
    def __init__(self) -> None:
        super().__init__("my_dynamixel_visualizer")
        #TODO: Create subscription
        self.create_config()
        self.create_visualizer()
        print("Created")

    def create_config(self):
        #TODO: Modify according to your robot
        self.my_conf_robot = cg.get_robot_config_2(link1=0.3, link1_offset=0.0,
                                        link2=0.3, link2_offset=0.0)

    def create_visualizer(self):
        self.robot_teach = self.my_conf_robot.teach(self.my_conf_robot.q, backend='pyplot', block=False)
        self.plot = pt.plot_baseplate(self.robot_teach)

    def listener_callback(self, msg):
        print("Received new data")
        #TODO: Assign the msg.data to the first joint of my_conf_robot.q
        #Hint: if you want to give degree commands, you need to convert it to radians. Use d2r()
        print(self.my_conf_robot.q)
        # Jog the robot on base plate
        self.plot.step()

def main(args=None):
    rclpy.init(args=args)
    node = myDynamixelVisualizer()
    rclpy.spin(node)

    rclpy.shutdown()

if __name__ == '__main__':
    main()
Our package now look like this:
Currently, we update the plot on every new data, even if the data is the same. It is quite inefficient. You can optimize such that you only update the plot when a different value is received. Brainstorm here on how to achieve it.
If the button doesn’t work: optimized_visualize_dxl.py
Voluntary Exercise: Update your robot via visualizer
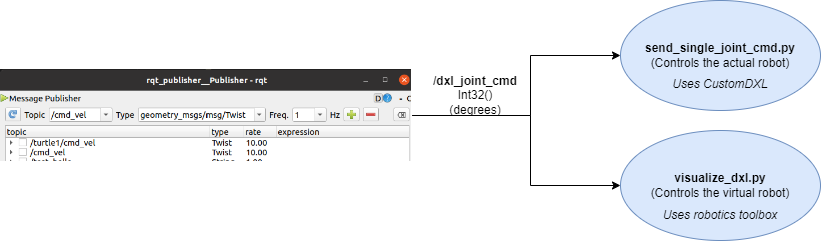
We have two nodes, one of which controls the real robot (send_single_joint_cmd.py) and the other visualizes the robot simulation. Often, you would like to see your robot configuration according to the given joint positions. Only after you are satisfied with the safety of the robot in this configuration, update the configuration of the real robot.
Let’s do this.
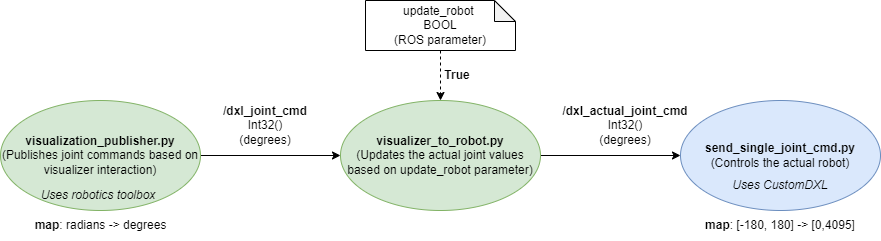
- Modify the send_single_joint_cmd.py such that it subscribes to the topic
/dxl_actual_joint_cmd. - Create a new middleware node names visualizer_to_robot.py. It should subscribe to the same topic as the visualizer (
/dxl_joint_cmd) does and publishes to the actual joint command topic (dxl_actual_joint_cmd) when a bool ROS parameter sets toTrue. The code for that looks like this: visualizer_to_robot.py - Run all three nodes in the figure above. (or even better: make a launch file!)
- Either modify the existing visualizer node or create a new one visualization_publisher.py
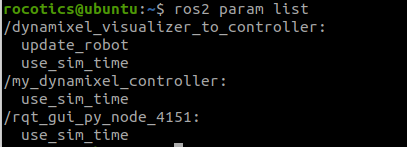
- Set update_robot parameter True whenever you want to send it to the robot:
ros2 param set /dynamixel_visualizer_to_controller update_robot True