Visualization (URDF and RViz)
In this tutorial, you will learn how a robot is modeled in ROS environment and how to visualize it.
Here is a simple dictionary of all the new terms/tools/programs you will be using in this tutorial.
- URDF: The model file of a robot (description of a robot).
- XACRO: It is also a model file like URDF but with some additional features. Think like that: XACRO = URDF + Macro
- Rviz: The main visualization software in ROS.
- Gazebo: The main simulation software in ROS.
- TF: (Transform) A ROS package that maintains the relationship between coordinate frames.
Robot model using URDF
What is a model? How can we define a robot model?
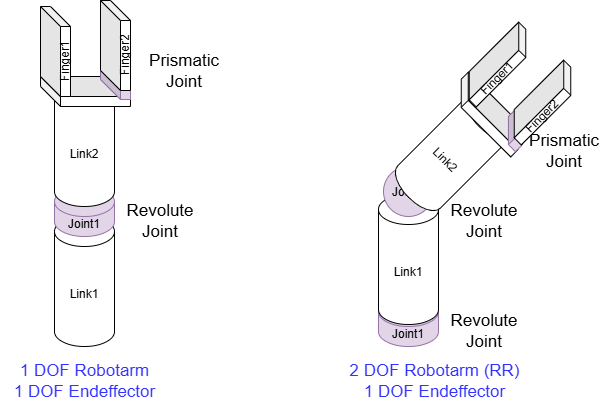
To tell this to the ROS system, we are using URDF files which are written in XML format.
URDF (Unified Robot Description Format) contains links, joints and basic material information of each part of the robot. You can follow this tutorial if you are interested in modeling R2D2 in URDF!
A simple URDF file looks like this. Let’s first understand it line by line referring the 1 DOF robot arm in the figure above - without the end-effector.
<?xml version="1.0"?>
<robot name="two_link_robot">

  <link name="link1">
    <visual>
      <origin xyz="0 0 0" rpy="0 0 0"/>
      <geometry>
        <cylinder radius="0.05" length="0.10"/>
      </geometry>
    </visual>
  </link>

  <link name="link2">
    <visual>
      <origin xyz="0 0 0" rpy="0 0 0"/>
      <geometry>
        <cylinder radius="0.05" length="0.10"/>
      </geometry>
    </visual>
  </link>

  <joint name="link1_to_link2" type="revolute">
    <axis xyz="0 0 1"/>
    <origin xyz="0 0 0.10" rpy="0 0 0"/>
    <parent link="link1"/>
    <child link="link2"/>
    <limit lower="-1.57" upper="1.57" effort="10" velocity="1"/>
  </joint>

</robot>
Please pay attention that we haven’t defined any physical properties of the robot such as its weight, material properties, color etc. This simple URDF model contains only the visual features of the robot. The robot is just a ghost now!
Why XACRO instead of URDF?
URDF supports only simple XML commands. Sometimes, you might have a very detailed robot which makes the URDF file extremely long. Or you want to import some properties from other compatible XML files. In such cases, you need to define macros. An URDF file which have macros in it are XACRO files.
XACRO = URDF + Macro
You can use XACRO files in almost anywhere that you need a URDF file. Therefore, we will define all our robots with .xacro extension so that noone confuses between tutorials. You just need to be aware that these two format are equally commonly used in the ROS world to describe a robot model.
Create your first robot
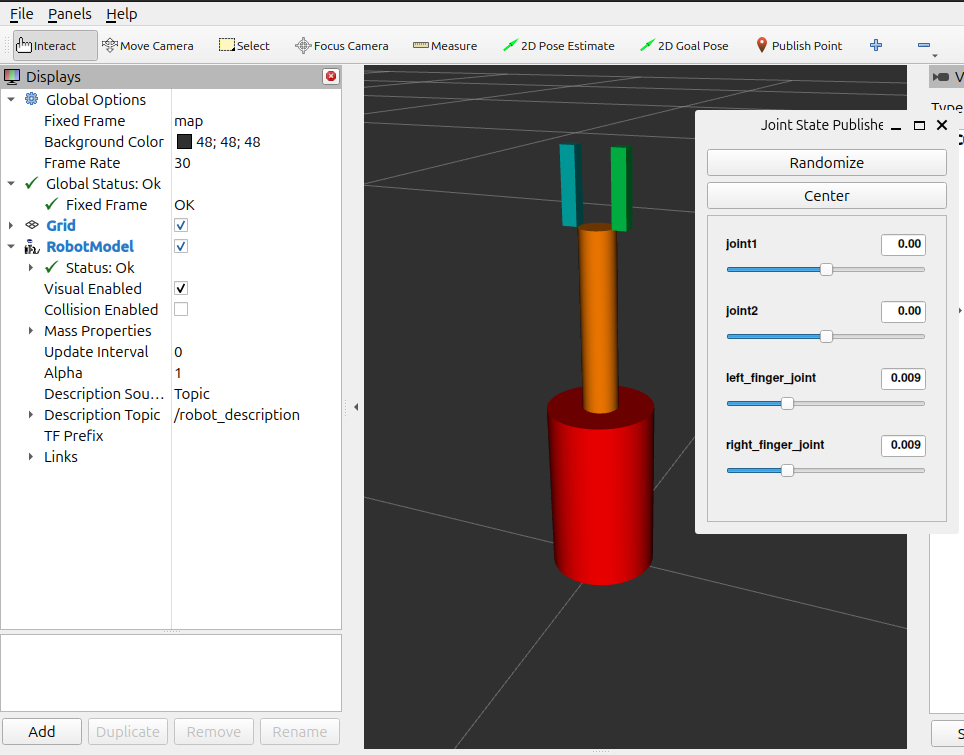
In this part of the tutorial, you are supposed to create a robotarm with two joints (RR-robotarm). The colors are not fasionable, but have a purpose; each colored part is actually a link.
- Open a terminal: Ctrl + Alt + T
- Change the directory to your workspace:
cd ~/ros2_ws/src - Create a new package:
ros2 pkg create --build-type ament_python --node-name my_robotarm_pkg my_robotarm_pkg - Go one directory up:
cd .. - Compile your workspace:
colcon build. Alternatively, you can compile just this packagecolcon build --packages-select my_robotarm_pkg - Source the changes in your workspace:
source install/setup.bash
So, we have a new package for a new robot!
- Change directory in your new package:
cd src/my_robotarm_pkg - Create a new folder to keep your robot models:
mkdir urdf - Create a new xacro file in this folder:
touch urdf/my_robotarm_simple.xacro
XACRO files are often quite long files. In order not to make the website too crowded with unnecessary code, we gathered relevant codes in a GitHub repository here. Follow this link and find my_robotarm_pkg, and follow the folders urdf>my_robotarm_simple.xacro. Copy and paste the content from there to your newly created file. You can access it quickly here.
Note that this is not the most common way to use Github. You’d normally clone the whole repo into your PC and work through the files locally. So, alternatively you can clone the repo and copy my_robotarm_simple.xacro file in your urdf folder. If you don’t know what I am talking about follow this link.
Visualization
Your robot is ready but you cannot “run” an XML file in the ROS system. You need a launch file to run the URDF/XACRO files.
- Change directory in your package:
cd ~/ros2_ws/src/my_robotarm_pkg - Create a new folder to keep your launch files:
mkdir launch - Create a new xacro file in this folder:
touch launch/my_robotarm.launch.py - Copy-paste the content from the same Github repo from here to ~/ros2_ws/src/my_robotarm_pkg/launch/my_robotarm.launch.py
Don’t forget to add the new folders in setup.py
import os ## Add-1
from glob import glob  ## Add-2
...
data_files=[
        ('share/ament_index/resource_index/packages',
            ['resource/' + package_name]),
        ('share/' + package_name, ['package.xml']),
        ## Add these
        (os.path.join('share', package_name, 'launch'), glob(os.path.join('launch', '*.launch.py'))),
        (os.path.join('share', package_name, 'urdf'), glob(os.path.join('urdf', '*.xacro'))),
        (os.path.join('share', package_name, 'config'), glob(os.path.join('config', '*.yaml'))),
    ],
...
We are ready to run. Run these in your ~/ros2_ws directory.
colcon build
source install/setup.bash
ros2 launch my_robotarm_pkg my_robotarm.launch.py
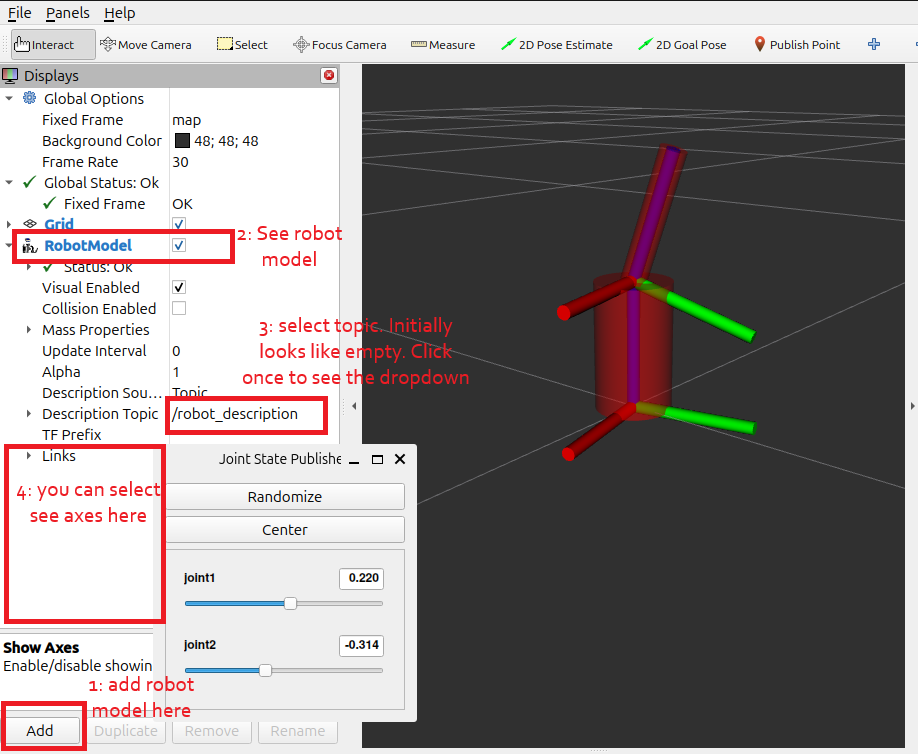
You will see Rviz started but you are not seeing any robots on the screen yet. There are 3 things we need to set on the left toolbox.
- Add RobotModel at the bottom left.
- Change the RobotModel description topic to /robot_description
You should be able to see the robot now.
If you press Ctrl + S, it will save these settings. Currently, we used my_robotarm_simple.xacro, therefore we don’t have any fingers or colors yet.
If you want to see the full robot arm with the end effector and the colors, you should either modify the XACRO file, or create a new one. Since the main purpose of this lecture is not to teach how to create a URDF/XACRO file, we have made it available another XACRO file in the package. Just create a new XACRO file naming my_robotarm_with_ee.xacro under your URDF folder, copy the content from Github and modify the launch/my_robotarm.launch.py file:
~/ros2_ws/src/my_robotarm_pkg/launch/my_mobile_robot.launch.py (Line 16-17)
to this:
xacro_file = os.path.join(package_path,
                              'urdf/',
                              'my_robotarm_with_ee.xacro')
We used my_robotarm_with_ee.xacro instead. If you save, colcon build (or no need if you ran colcon build --symlink-install earlier) and ros2 launch my_robotarm_pkg my_robotarm.launch.py, you should see the colorful robot.
You can also observe the axes (reference frames of each axis) under Links > Show Axes. Also play with alpha value to make axes visible through the links. Alternatively, you can aff TF element via add button, where you added the robot model.