Simulation (Gazebo)
In this tutorial, you will learn about simulation in ROS using Gazebo. You will also learn briefly the physical andy dynamic (inertia and collision) properties of an object and how to create a simulated world.
Gazebo
Gazebo is the most used simulator in ROS. It has integrated physics rules like gravity, colision, light distribution with reflection and refraction properties, mass and inertia etc. Now, we will see how to set the Gazebo for very basic usage.
You should always remember. Although RViz and Gazebo seems pretty similar, they are used in completely different purposes. Rviz is for visualization (of robots, sensors etc.), Gazebo is for simulation (of robots, objects, environment etc.).
Before continuing this tutorial please run these commands:
sudo apt update
sudo apt upgrade
Modify XACRO
With the current URDF model we cannot visualize our robot in Gazebo because we haven’t defined any physical properties. We need to improve the URDF model by adding some
Add Gazebo elements in launch
We will modify ~/ros2_ws/src/my_robot_pkg/launch/my_mobile_robot.launch.py
1.Change XACRO file: my_mobile_robot_inertia_collision.xacro
2.Call the necessary Gazebo related nodes in the launch file:
# Include the Gazebo launch file, provided by the gazebo_ros package
start_gazebo = IncludeLaunchDescription(
            PythonLaunchDescriptionSource([os.path.join(
                get_package_share_directory('gazebo_ros'), 'launch', 'gazebo.launch.py')]),
            )

# Spawn the robot using gazebo_ros package.
spawn_entity = Node(package='gazebo_ros', executable='spawn_entity.py',
                    arguments=['-topic', 'robot_description',
                                '-entity', 'my_mobile_robot'],
                    output='screen')
3.Add executables in LaunchDescription()
return LaunchDescription([
        node_robot_state_publisher,
        node_joint_state_publisher_gui,
        node_tf,
        node_rviz,
        start_gazebo,
        spawn_entity
    ])
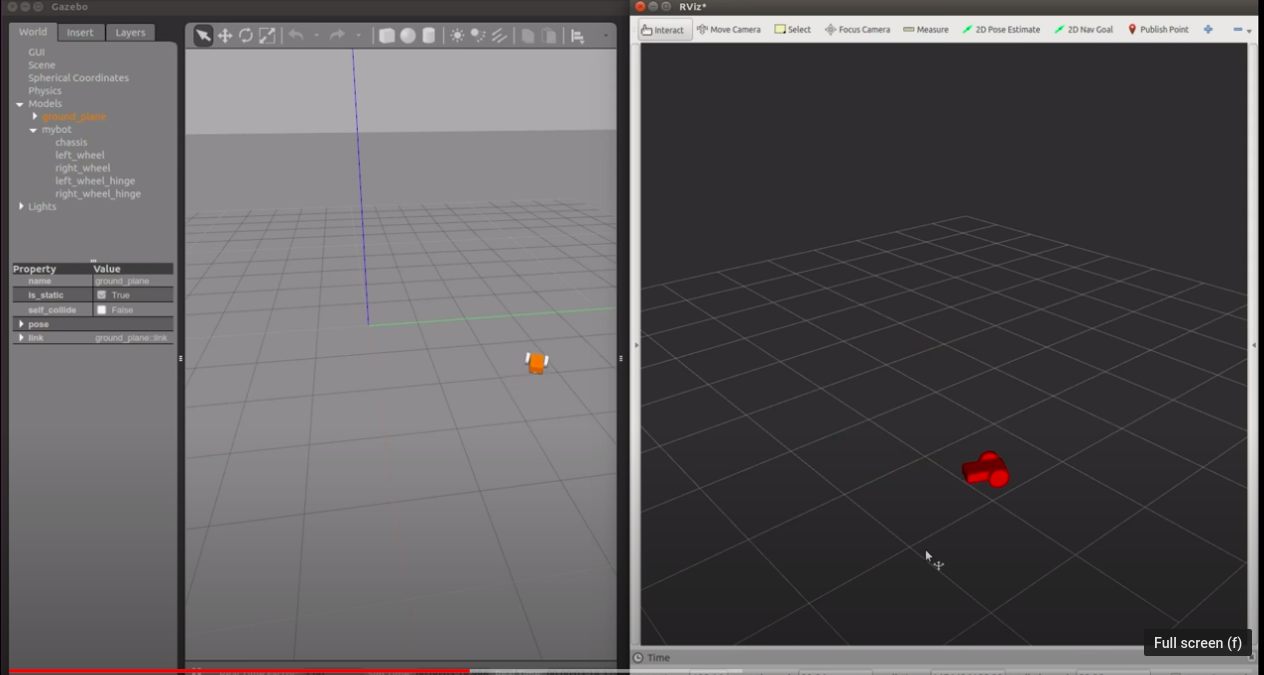
We are ready to run. Run these in your ~/ros2_ws directory.
colcon build
ros2 launch  my_robot_pkg my_mobile_robot.launch.py
Adding controller
We are going to add a differential drive controller and joint state broadcaster on our 2 wheel robot.
This part is a bit more complicated to describe each detail in such a short time. Therefore, we provide you the necessary template files, go throught the process and focus only on the key points so that you can use them if you need in your project.
There are a couple of different ways adding controllers to your robot. We will use ros2_contror but be aware that there are different ways if you use other tutorials. The official documentation for ros2_control is here. You need to choose the necessary driver for your robot in your semester project if you use another robot than a differential robot.
These are already fixed for you:
- Define controller parameters. This is done in /config/my_controllers.yaml.
- Define
command_interfaceandstate_interfacefor ros2_control in your robot model. To keep things clean, we defined them in /urdf/gazebo_control.xacro. We already added this into /urdf/my_mobile_robot_inertia_collision.xacro which is our main URDF. - Tell Gazebo to use ros2_control. This is already done in /urdf/gazebo_control.xacro.
You should do these changes:
- Modify your launch file such that use the controller+sensor XACRO file:
my_mobile_robot_sensor.xacro - Start controllers in the launch file. Add the following part at the end of your launch file. Remember to add them in the
LaunchDescription(), as well.
    joint_state_broadcaster_spawner = Node(
        package="controller_manager",
        executable="spawner.py",
        arguments=["joint_state_broadcaster", "--controller-manager", "/controller_manager"],
    )

    diff_drive_spawner = Node(
        package="controller_manager",
        executable="spawner.py",
        arguments=["diffbot_base_controller", "--controller-manager", "/controller_manager"],
    )


    return LaunchDescription([
        node_robot_state_publisher,
        # node_joint_state_publisher_gui,
        node_tf,
        node_rviz,
        start_gazebo,
        spawn_entity,
        joint_state_broadcaster_spawner,
        diff_drive_spawner
    ])
At this point, you do not need node_joint_state_publisher_gui. Please make sure that it is commented out.
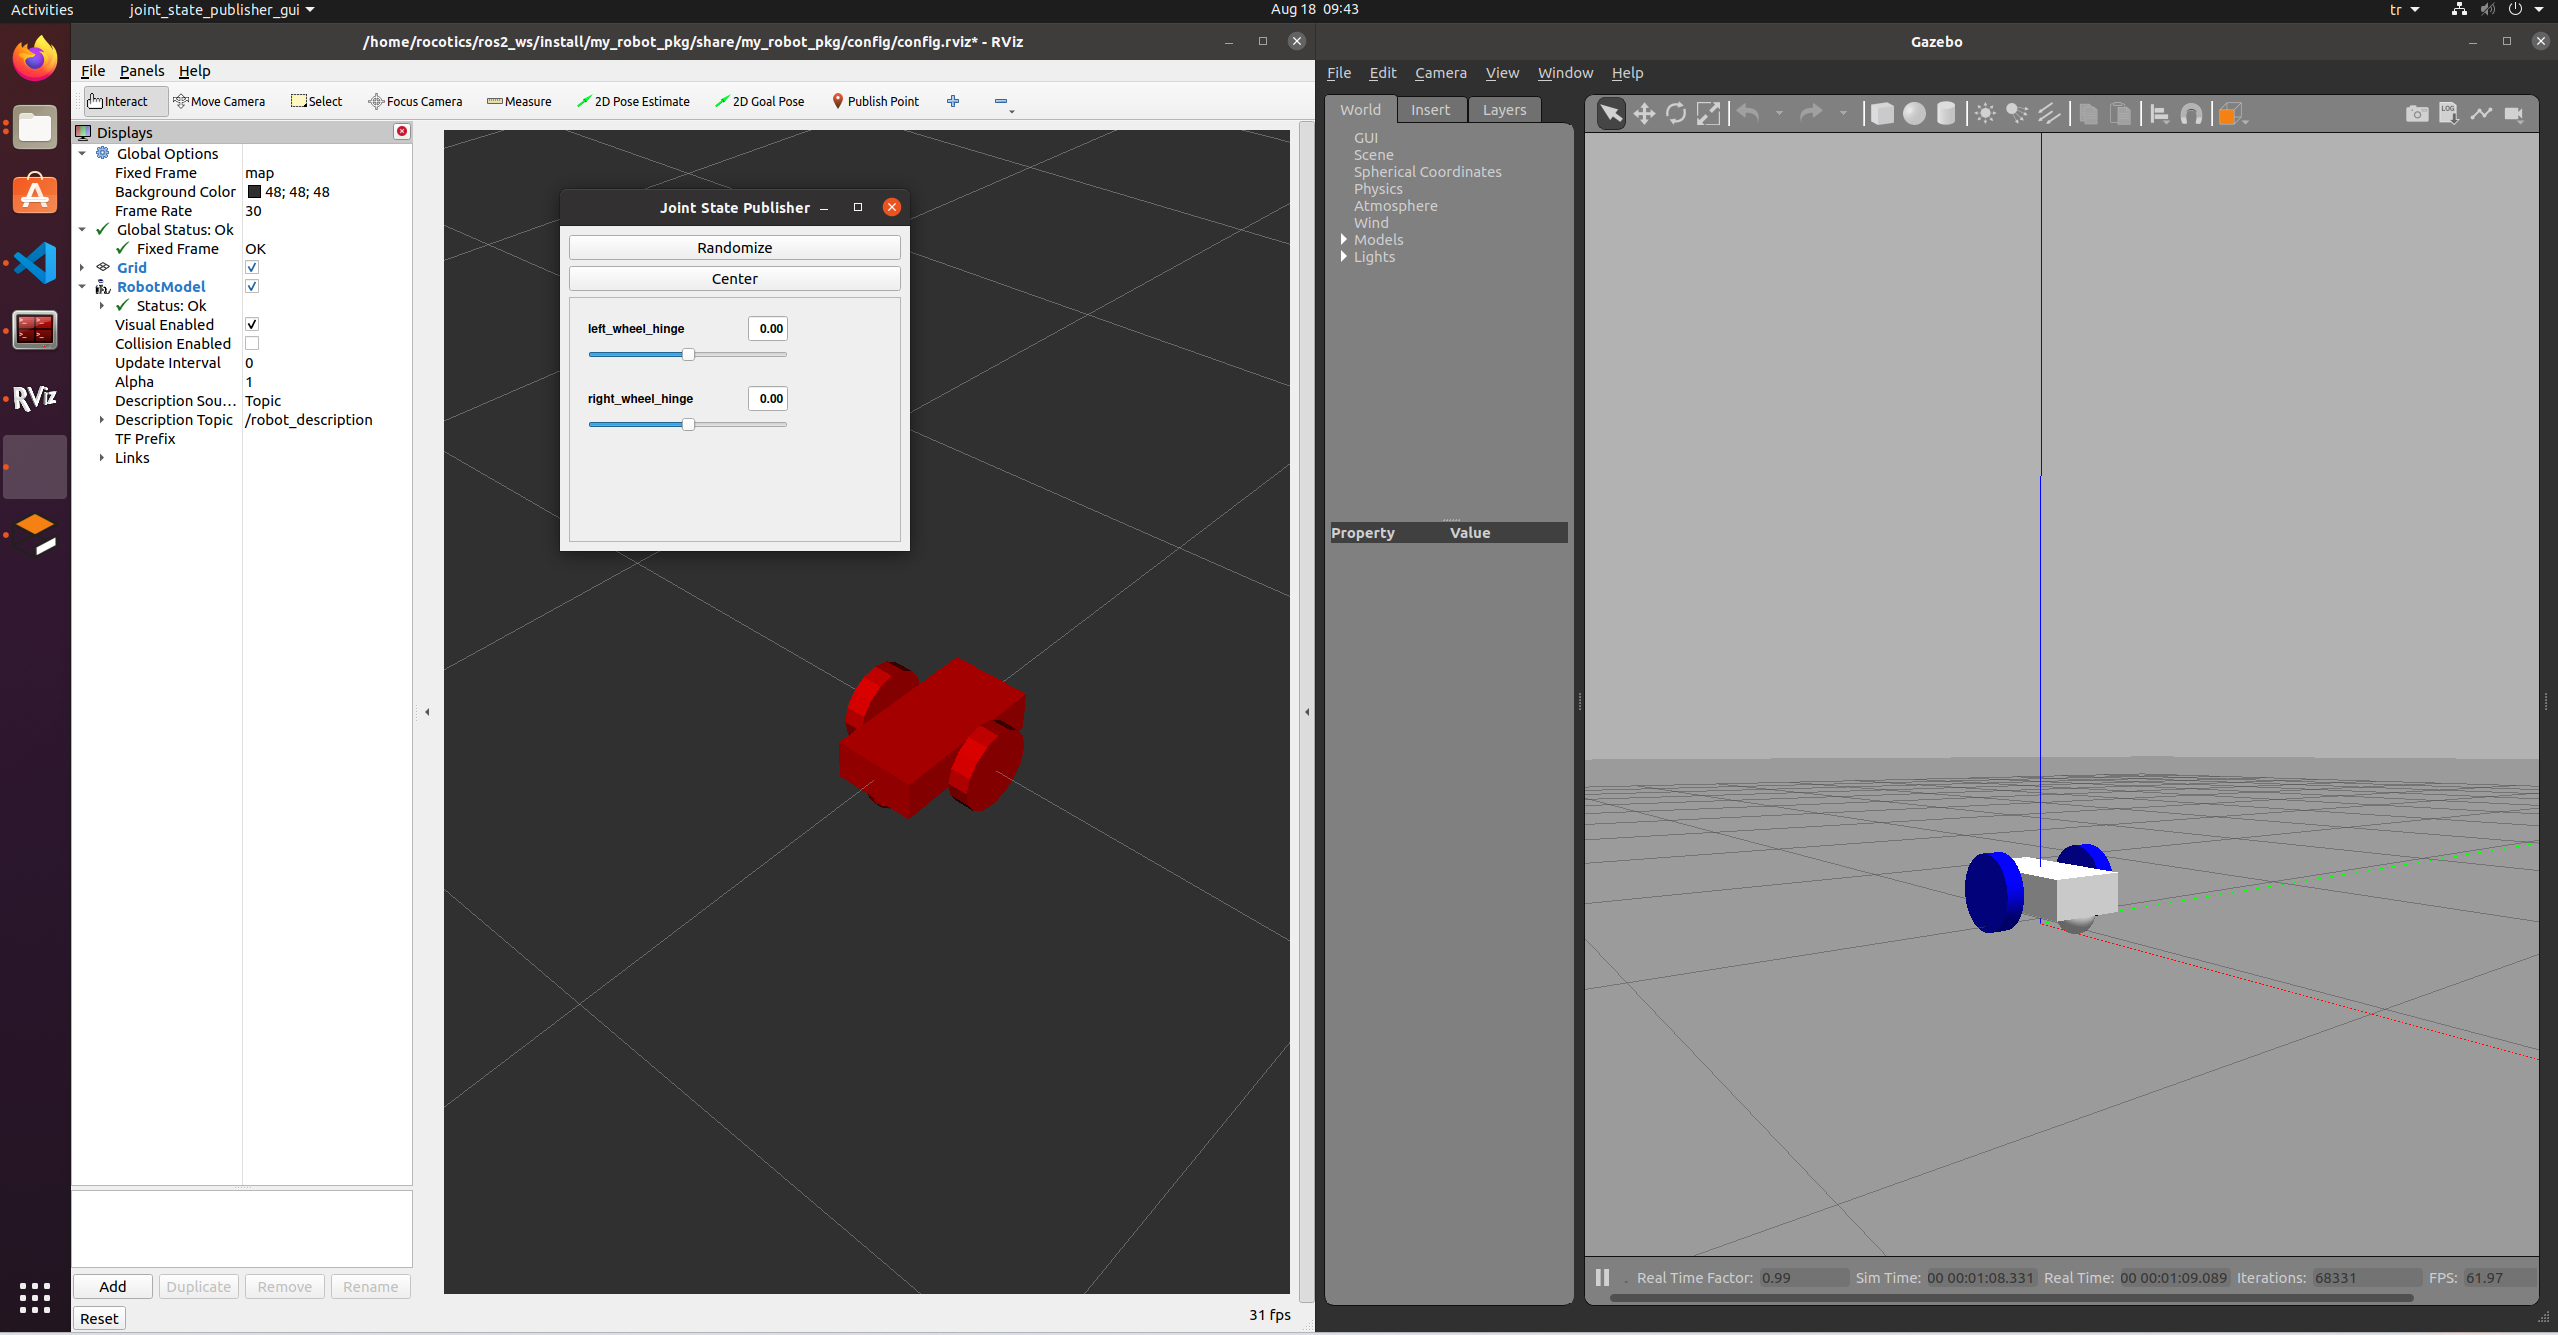
We are ready to run. Run these in your ~/ros2_ws directory.
colcon build
ros2 launch  my_robot_pkg my_mobile_robot.launch.py
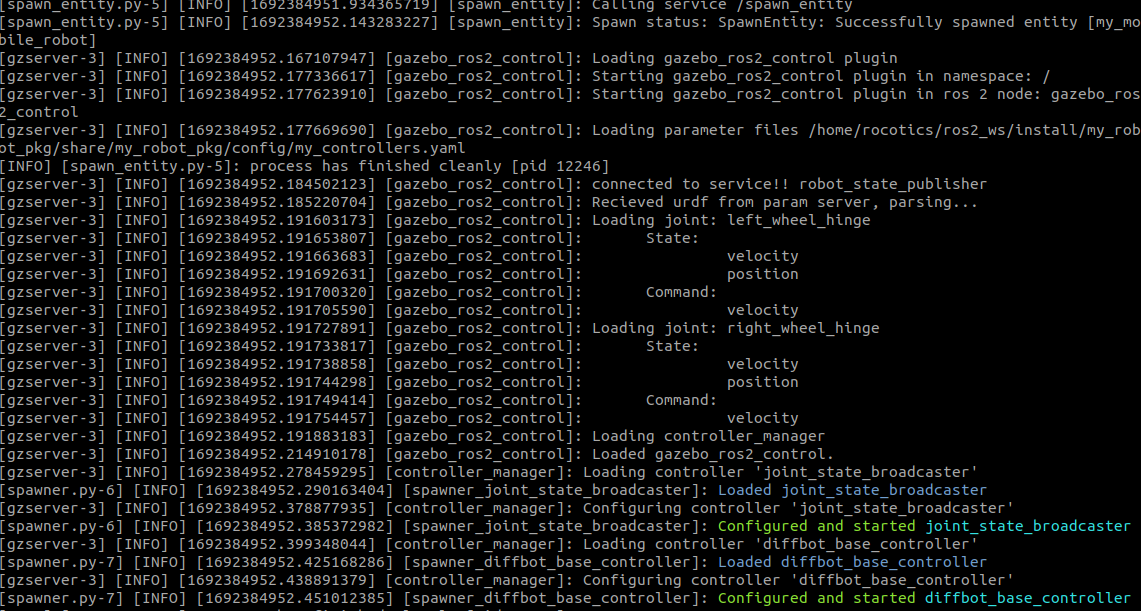
Observe controllers
Let’s check if both of the controllers are up and running. The first indication is on your terminal when you run the launch file:
You can also list controllers with the following command: ros2 control list_controllers:

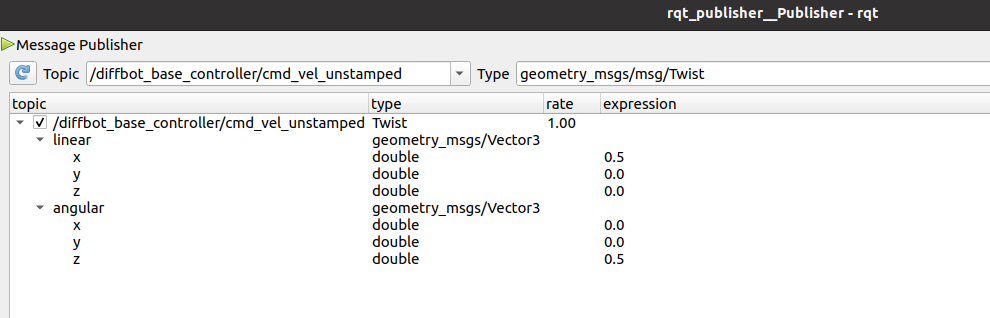
You can also control your robot by directly publishing to the respective \cmd_vel topic via rqt_publisher
ros2 run rqt_publisher rqt_publisher
Adding sensors
To add sensors, we will use gazebo plugins. Camera is probably one of the most common sensor. Let’s add camera:
1.Tell Gazebo to use ros2_control. This is also done in /urdf/gazebo_control.xacro.
<!--link : https://www.raspberrypi.org/documentation/hardware/camera/-->
  <gazebo reference="camera_rgb_frame">
    <sensor name="camera" type="camera">
        <always_on>true</always_on>
        <visualize>true</visualize>
        <update_rate>30</update_rate>
        <camera name="picam">
          <horizontal_fov>1.085595</horizontal_fov>
          <image>
              <width>640</width>
              <height>480</height>
              <format>R8G8B8</format>
          </image>
          <clip>
              <near>0.03</near>
              <far>100</far>
          </clip>
          <noise>
            <type>gaussian</type>
            <!-- Noise is sampled independently per pixel on each frame.
                  That pixel's noise value is added to each of its color
                  channels, which at that point lie in the range [0,1]. -->
            <mean>0.0</mean>
            <stddev>0.007</stddev>
          </noise>
        </camera>
          <plugin name="camera_driver" filename="libgazebo_ros_camera.so">
            <ros>
              <!-- <namespace>test_cam</namespace> -->
              <!-- <remapping>image_raw:=image_demo</remapping> -->
              <!-- <remapping>camera_info:=camera_info_demo</remapping> -->
            </ros>
            <!-- camera_name>omit so it defaults to sensor name</camera_name-->
            <!-- frame_name>omit so it defaults to link name</frameName-->
            <!-- <hack_baseline>0.07</hack_baseline> -->
          </plugin>
      </sensor>
    </gazebo>
2.It is already added a camera link to your URDF (/urdf/my_mobile_robot_sensor.xacro):
  <joint name="camera_joint" type="fixed">
    <origin xyz="0.073 -0.011 0.084" rpy="0 0 0"/>
    <parent link="base_link"/>
    <child link="camera_link"/>
  </joint>

  <link name="camera_link">
    <collision>
      <origin xyz="0.005 0.011 0.013" rpy="0 0 0"/>
      <geometry>
        <box size="0.015 0.030 0.027"/>
      </geometry>
    </collision>
  </link>

  <joint name="camera_rgb_joint" type="fixed">
    <origin xyz="0.003 0.011 0.009" rpy="0 0 0"/>
    <parent link="camera_link"/>
    <child link="camera_rgb_frame"/>
  </joint>
  <link name="camera_rgb_frame"/>

  <joint name="camera_rgb_optical_joint" type="fixed">
    <origin xyz="0 0 0" rpy="-1.57 0 -1.57"/>
    <parent link="camera_rgb_frame"/>
    <child link="camera_rgb_optical_frame"/>
  </joint>
  <link name="camera_rgb_optical_frame"/>
We are ready to run. Run these in your ~/ros2_ws directory.
colcon build
ros2 launch  my_robot_pkg my_mobile_robot.launch.py
ros2 run rqt_image_view rqt_image_view- Observe on Rviz
- Put some obstacles.
Note: If your robot doesn’t spawn in Gazebo, but is was spawning before, you might be missing some ros2_control packages. Please run these commands in your terminal: sudo apt install ros-foxy-ros2-control* and sudo apt install ros-foxy-gazebo-*
Adding world
Currently, the world is empty and meaningless (smile here). We can add lots of predefined or custom models into our world.
The following code piece shows how to spawn your robot in a world with gazebo_ros node.
  # Define your world path
  world_file_path = os.path.join(get_package_share_directory(my_robot_pkg), 'worlds', 'my_world.world')

  # Starting Gazebo with world
      gazebo = IncludeLaunchDescription(
          PythonLaunchDescriptionSource([os.path.join(get_package_share_directory('gazebo_ros'), 'launch'), '/gazebo.launch.py']),
          launch_arguments={'world': world_file_path}.items()
      )
And a simple world file looks like this:
<?xml version="1.0" ?>
<sdf version="1.6">

  <world name="default">

    <include>
      <uri>model://ground_plane</uri>
    </include>

    <!-- Global light source -->
    <include>
      <uri>model://sun</uri>
    </include>

    <!-- Focus camera on tall pendulum -->
    <gui fullscreen='0'>
      <camera name='user_camera'>
        <pose>4.927360 -4.376610 3.740080 0.000000 0.275643 2.356190</pose>
        <view_controller>orbit</view_controller>
      </camera>
    </gui>

  </world>
</sdf>
We can add some items by just adding items as we included the sun and the ground plane into our world file. There are many ready-to-use models in the official gazebo-models repository. Now, choose a model and as in the following code.
  <!-- Add an object -->
      <include>
        <uri>model://postbox</uri>
      </include>
You can change the position and orientation of any object which you have added with the <pose>x y z roll pitch yaw</pose> tag. Probably the easiest is to design the world in Gazebo and directly save there.
Don’t forget to add your /world folder directory in the setup.py
Troubleshooting
Cannot do “sudo apt update”
The problem is either about your internet connection or ROS 2 GPG Key. First make sure that you have internet. Afterwards open a new terminal and paste this command: sudo curl -sSL https://raw.githubusercontent.com/ros/rosdistro/master/ros.key -o /usr/share/keyrings/ros-archive-keyring.gpg
Now you can:
sudo apt update
sudo apt upgrade
Getting “cache lock” error
It might be your lock-frontend process blocking the system. Find its process id (PID) and kill the process:
sudo lsof /var/lib/dpkg/lock-frontend
Use this PID and replace <PID> in the next command:
sudo kill -9 <PID>
Robot looks weird on Gazebo
That is such an annoying problem but let’s try. Probably your ros2-control packages are outdated and ´sudo apt upgrade´ cannot fix them - IDK why. We can remove them and reinstall them. Try using these commands:
sudo apt remove  ros-foxy-ros2-control*
sudo apt remove ros-foxy-gazebo-*
sudo apt update
sudo apt upgrade
sudo apt install ros-foxy-ros2-control*
sudo apt install ros-foxy-gazebo-*
and then restart the VM.