UR Machine Tending
Danger: Before connecting IO, turn the robot off and disconnect the power. Waita minute for any charge to dissipate. Or risk the unfortunate fate of being human toast! 🍞
Warning: If you wear out the IO connections by abusing them, shame on you! 🔔 shame! 🔔 shame!
You can store your installation as you store a program. Changes to the default installation will be deleted.
Theme
- External E-stop
- Digital IO for program flow
- Relative waypoints
- Built-in functions
- Templates
- Machine tending
Equipment
-
UR5e robot with PolyScope.
-
Robotiq 2-Finger Adaptive Robot Gripper / Hand-E Gripper
-
Lab station with
- E-stop, box with red button and 2 sets of wiring
- Workpiece holder
- Stack of workpieces
- Big box with sliding door.
Before the lab
1.Very important: Complete the Universal Robots Academy
- Setting up a tool
- Safety settings
- Program Flow
- Feature Coordinates
2.Try to get together in a group of 2-4 people.
3.Top tip for preparing: Use the offline simulator from UR. For the ambitious; do all your programming in the simulator, bring your saved program to the lab, bridge the simulation gap, success! 🌈 Or just wait for the lab to do it directly on the real robot…
Report
There is no need to hand in a report after this lab. Signed attendance will suffice as approved lab exercise.
Tasks
Connect and test the E-stop
The UR cabinet is ready for the E-stop to be connected using a screwdriver. The E-stop IO's in the cabinet are all connected by short-wires, giving the E-stop inputs high signals at all times. If, for any reason, this voltage goes away, an emergency stop is triggered just as when using the E-stop on the pendant.
The new E-stop contains 2 NC switches. If the red button is pressed, the switches are opened, breaking the circuits.
- Shutdown the robot
- Disconnect power
- Wait a minute
- Connect the new E-stop
- Fire up the robot again and verify that all E-stops work
Connect Control box digital IO's, test IO's
You will connect a total of 4 digital inputs to the UR, from the controlbox.
- Shutdown the robot
- Disconnect power
- Wait a minute
- Make the necessary connections to connect buttons and indicators todigital I/O.
- Fire up the robot again
- Test and name the inputs
Elements of the Work Station
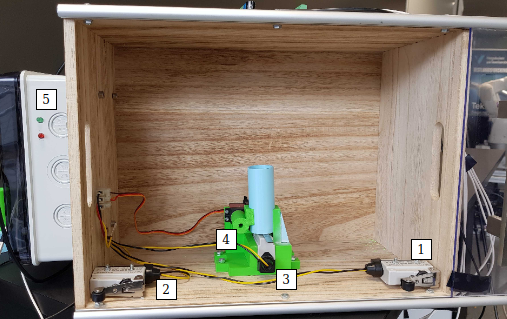
- Door_open sensor
- Door_close sensor
- Workpiece_sensor
- Clamp servo
- Ready_LED and busy_LED
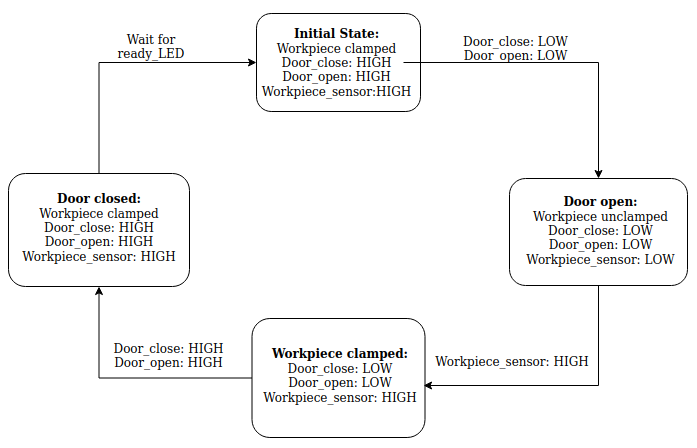
Finite-State Sequence of the Machine Tending Box
Set the machine to its initial state when starting up.
Make a program to open the machine door
Make a program to open the machine door. This might sound easier than it is. Feel free to fasten the box. Consider using force control.
Make a program to close the machine door
Make a program to close the machine door. Same as above, but closed.
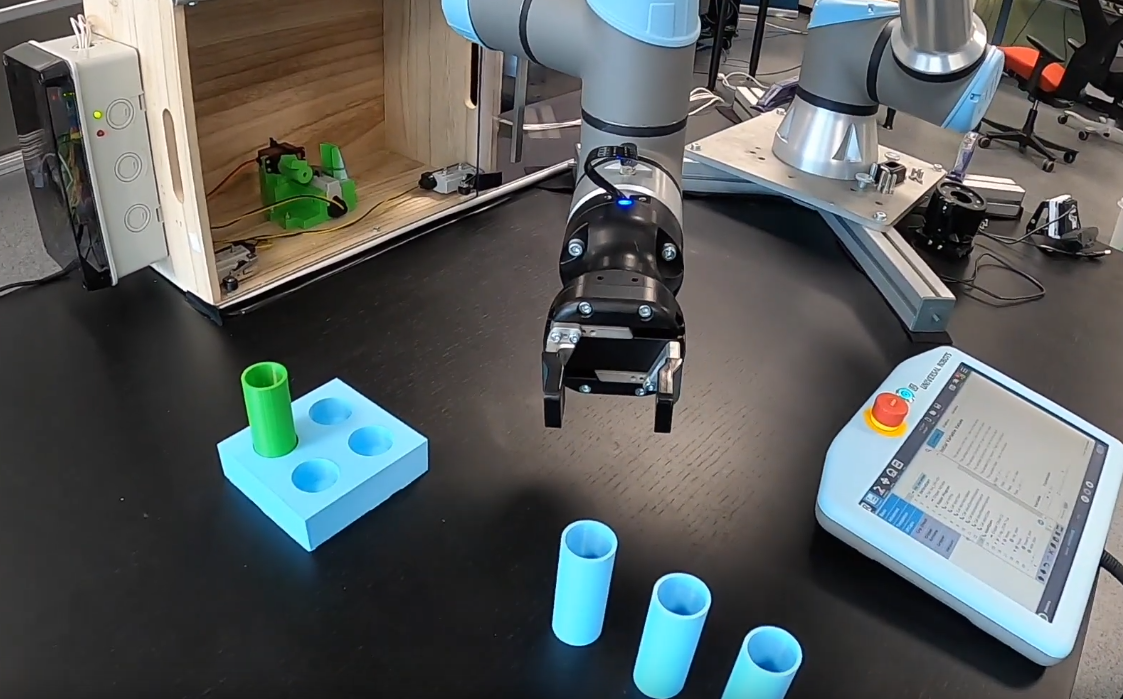
Make a program to pick up a workpiece
Make a program to pick a workpiece. There are several ways to do this. Consider the following suggestion as a starting point:
- Move to a waypoint above the workpiece.
- Lower slowly relative to the waypoint above.
- Close gripper, until workpiece is detected.
- Relative move up 1 cm.
- Move to position.
The direction option can be used to detect an object on contact and perform an action. Also, have a look at stack/de-stack options on the UR5e.
It is also possible to detect the force applied to the gripper on contact, with pre-built functions. Have a look at them!
Tip: my_variable = get_actual_tcp_pose() and add 0.01meters to the Z index, then MoveL to this variableposition.
Make a program to place a workpiece in the work station
Make a program to place a workpiece in the work station. Try to be as accurate as possible when placing the workpiece!
Make a program to place workpieces in a grid
Make a program to place the workpieces in a grid. There are several ways to do this. Consider the following suggestions as a starting point:
- Make a waypoint at a corner of your grid.
- Make a counter, row_num.
- Increment counter each time a box is picked from machine.
- Offset placement waypoints by using row_num.
- Add col_num to the mix.
Also, take a look at palletize/de-palletize options on the UR5e for thebuilt-in template.
Combine everything to a complete machine tending program
Using the above programs as subprograms or copy/paste source, make a program to open the door, fetch the workpiece, place them in a grid, feed the machine a new workpiece and close the door. Wait until it’s finished. And repeat. One workpiece at a time.
Voilà! Kick your feet up and let the robot do all the work!
Questions
- The E-stop has 2 NC switches. Why?
- How many tasks did you complete? What kept you from completingeverything?
- If the robot or the "CNC" changed location, how would you updatethe program?
- What are the pros and cons between cobots and industrial robots?
- Discuss how cobots can be applied to enhance workflow for a company,or in everyday life.
- Does the configuration of the robot affect the applied force whenopening/closing the door?
- Did you remember to have fun?