Robot Vision
In this assignment you will implement and tune a blob tracker that is used to make a robot follow a red ball into a goal. The environment is cluttered with other balls of different colors and sizes, and the illumination changes along the way - your blob tracker must be sufficiently tuned to be robust to these challenges.
Similar to the previous assignment, the steps to complete this task will be outlined but the exact code/commands needed you will have to figure out yourself using what you have learned in the lecture, the information available on this website or what you can find on the internet.
You will work with a Turtlebot in a simulated environment. The robot is equipped with a camera that provides a stream of images to a '/camera/image_raw' topic. Your task is to implement a blob detector pipeline in a ROS2 node that subscribes to the camera topic. The output of the blob detector must be a single blob that is passed to a controller. The controller uses the pixel coordinates and the size of the blob to navigates the robot towards the blob. The controller is already implemented in the provided node.
Controlling a robot based on camera input is a common approach in robotics and is often referred to as visual servoing.
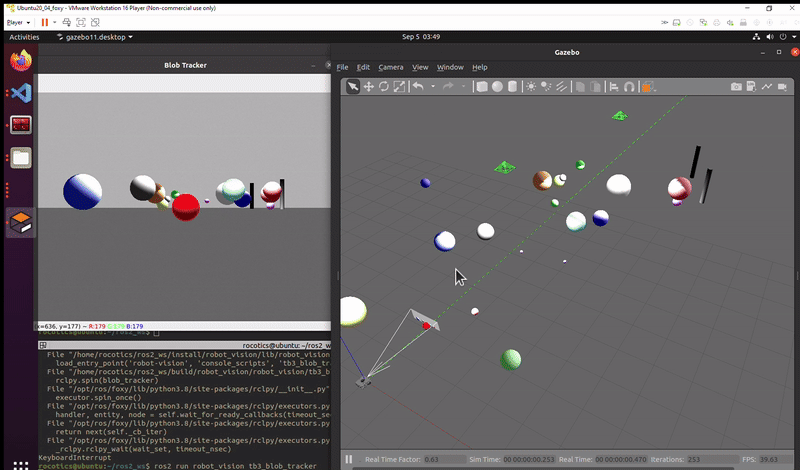 Successful execution of the task: Turtlebot tracks the red ball all the way through the two goal posts.
Setup Process
- Open a new terminal by pressing: Ctrl+Alt+T
- Change directory into the source folder of your ROS2 workspace:
cd ~/ros2_ws/src - Create a ROS2 python package with the name robot_vision:
ros2 pkg create --build-type ament_python robot_vision - Copy the folders launch, urdf and worlds from the ros2_students_25/robot_vision git repository to your newly created package (ros2_ws/src/robot_vision)
- In ROS2 the python scripts of packages are located in a folder with the same name as the package. Copy the files tb3_blob_tracker.py and command_sphere.py from the ros2_students_25/robot_vision git repository to the scripts folder of your package (ros2_ws/src/robot_vision/robot_vision)
- In the setup.py file of your package add the following lines:
# Add after: from setuptools import setup import os from glob import glob # In order to be able to access the added files during runtime we add we add them to data_files # Add after: ('share/' + package_name, ['package.xml']), (os.path.join('share', package_name, 'launch'), glob(os.path.join('launch', '*.launch.py'))), (os.path.join('share', package_name, 'worlds'), glob(os.path.join('worlds', '*.world'))), (os.path.join('share', package_name, 'urdf'), glob(os.path.join('urdf', '*.xacro'))), #To make our python script excecutable with ros2 run, we add a entry_points definition #Add after: 'console_scripts': [ 'tb3_blob_tracker = robot_vision.tb3_blob_tracker:main', 'command_sphere = robot_vision.command_sphere:main', - Move to workspace directory, build your workspace and source it:
cd ~/ros2_ws colcon build --symlink-install source install/setup.bash - To launch the Gazebo simulation use:
ros2 launch robot_vision spawn_robot.launch.pyThe launch file also launches the
command_spherenode which is responsible for moving the red ball around the environment. You can easily restart the simulation and ball movement by pressingCtrl+Rin the Gazebo Window (or going to the Gazebo menu and selectingEdit -> Reset World).
Assignment Steps
Open the tb3_blob_tracker.py in VSCode. You will find comments marked with TODO, where you need to modify or add code. The steps are listed below, but refer to the comments in the code for more detailed instructions.
- In the
__init__function you need to:- make a subscriber to the camera topic
- define blob detector filter parameters
- create a blob detector object
- In the
image_callbackfunction you need to:- implement blob detection pipeline. Consider changing the color space of the image, thresholding and filtering with the blob detector filters. Remember what we discussed in the lectures.
- After implementing all of the things above, build the workspace and launch the simulation
ros2 launch robot_vision spawn_robot.launch.pyand in another terminal run the tb3_blob_tracker.py node:
ros2 run robot_vision tb3_blob_tracker - Observe the Turtlebot following the red ball. If the robot is not following the red ball all the way to the goal, try to tune/modify your blob detector pipeline. Remember that you can restart the simulation easily with
Crtl+R. For debugging it can be useful to show the image at different stages of the pipeline. You can use this syntax to show an image with OpenCV:cv2.imshow("My image title", my_image) cv2.waitKey(1) - You have successfully completed the assignment when the robot follows the red ball all the way to the goal. Yaay!