Visualization (URDF and RViz)
In this tutorial, you will learn how a robot is modeled in ROS environment and how to visualize it.
Here is a simple dictionary of all the new terms/tools/programs you will be using in this tutorial.
- URDF: The model file of a robot (description of a robot).
- XACRO: It is also a model file like URDF but with some additional features. Think like that: XACRO = URDF + Macro
- Rviz: The main visualization software in ROS.
- Gazebo: The main simulation software in ROS.
- TF: (Transform) A ROS package that maintains the relationship between coordinate frames.
Robot model using URDF
What is a model? How can we define a robot model?
To tell this to the ROS system, we are using URDF files which are written in XML format.
URDF (Unified Robot Description Format) contains links, joints and basic material information of each part of the robot. You can follow this tutorial if you are interested in modeling R2D2 in URDF!
A simple URDF file looks like this. Let’s first understand it line by line.
<?xml version="1.0"?>
<robot name="myrobot">
  <link name="body">
    <visual>
    <origin xyz="0 0 0" rpy=" 0 0 0"/>
      <geometry>
        <box size="0.6 0.1 0.2"/>
      </geometry>
    </visual>
  </link>

  <link name="wheel1">
    <visual>
    <origin xyz="0 0 0" rpy="0 1.5707 1.5707"/>
      <geometry>
        <cylinder length="0.6" radius="0.2"/>
      </geometry>
    </visual>
  </link>

  <joint name="body_to_wheel1" type="revolute">
    <axis xyz="0 0 1"/>
    <origin xyz="0.1 0.15 0" rpy="0 0 0"/>
    <parent link="body"/>
    <child link="wheel1"/>
  </joint>

</robot>
Please pay attention that we haven’t defined any physical properties of the robot such as its weight, material properties, color etc. This simple URDF model contains only the visual features of the robot.
Why XACRO instead of URDF?
URDF supports only simple XML commands. Sometimes, you might have a very detailed robot which makes the URDF file extremely long. Or you want to import some properties from other compatible XML files. In such cases, you need to define macros. An URDF file which have macros in it are XACRO files.
XACRO = URDF + Macro
You can use XACRO files in almost anywhere that you need a URDF file. Therefore, we will define all our robots with .xacro extension so that noone confuses between tutorials. You just need to be aware that these two format are equally commonly used in the ROS world to describe a robot model.
Create your first robot
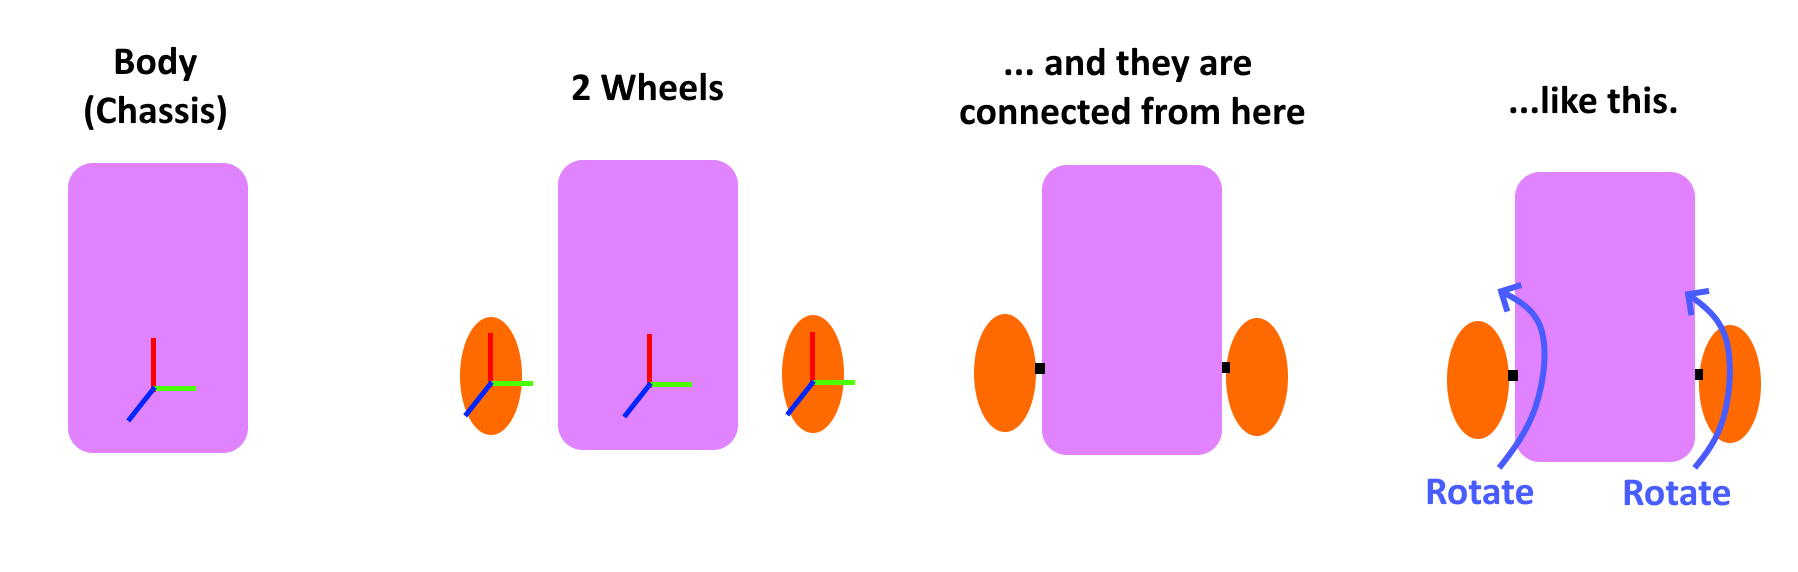
In this part of the tutorial, you are supposed to create a mobile robot with 2 individually actuated wheels.
- Open a terminal: Ctrl + Alt + T
- Change the directory to your workspace:
cd ~/ros2_ws/src - Create a new package:
ros2 pkg create --build-type ament_python --node-name my_robot_pkg my_robot_pkg - Go one directory up:
cd .. - Compile your workspace:
colcon build - Source the changes in your workspace:
source install/setup.bash
So, we have a new package for a new robot!
- Change directory in your new package:
cd src/my_robot_pkg - Create a new folder to keep your robot models:
mkdir urdf - Create a new xacro file in this folder:
touch urdf/my_mobile_robot_simple.xacro - Copy-paste the content below:
~/ros2_ws/src/my_robot_pkg/urdf/my_mobile_robot_simple.xacro
<?xml version='1.0'?>

<robot name="my_mobile_robot" xmlns:xacro="http://www.ros.org/wiki/xacro">

  <link name='base_link'>
    <pose>0 0 0.1 0 0 0</pose>
    <visual name='chassis_visual'>
      <origin xyz="0 0 0" rpy=" 0 0 0"/>
      <geometry>
        <box size=".4 .2 .1"/>
      </geometry>
    </visual>

    <visual name='caster_visual'>
      <origin xyz="-0.15 0 -0.05" rpy=" 0 0 0"/>
      <geometry>
        <sphere radius="0.05"/>
      </geometry>
    </visual>
  </link>

  <link name="left_wheel">
    <visual name="left_wheel_visual">
      <origin xyz="0 0 0" rpy="0 1.5707 1.5707"/>
      <geometry>
        <cylinder radius="0.1" length="0.05"/>
      </geometry>
    </visual>
  </link>

  <link name="right_wheel">
    <visual name="right_wheel_visual">
      <origin xyz="0 0 0" rpy="0 1.5707 1.5707"/>
      <geometry>
        <cylinder radius="0.1" length="0.05"/>
      </geometry>
    </visual>
  </link>

  <joint type="continuous" name="left_wheel_hinge">
    <origin xyz="0.1 0.15 0" rpy="0 0 0"/>
    <child link="left_wheel"/>
    <parent link="base_link"/>
    <axis xyz="0 1 0" rpy="0 0 0"/>
    <limit effort="100" velocity="100"/>
    <joint_properties damping="0.0" friction="0.0"/>
  </joint>

  <joint type="continuous" name="right_wheel_hinge">
    <origin xyz="0.1 -0.15 0" rpy="0 0 0"/>
    <child link="right_wheel"/>
    <parent link="base_link"/>
    <axis xyz="0 1 0" rpy="0 0 0"/>
    <limit effort="100" velocity="100"/>
    <joint_properties damping="0.0" friction="0.0"/>
  </joint>
</robot>
Visualization
Your robot is ready but you cannot “run” an XML file in the ROS system. You need a launch file to run the URDF/XACRO files.
- Change directory in your package:
cd ~/ros2_ws/src/my_robot_pkg - Create a new folder to keep your launch files:
mkdir launch - Create a new xacro file in this folder:
touch launch/my_mobile_robot.launch.py - Copy-paste the content below:
~/ros2_ws/src/my_robot_pkg/launch/my_mobile_robot.launch.py
from launch import LaunchDescription
from launch.actions import IncludeLaunchDescription
from launch.launch_description_sources import PythonLaunchDescriptionSource
from launch_ros.actions import Node

import os, time
import xacro
from ament_index_python.packages import get_package_share_directory

def generate_launch_description():

    package_name = 'my_robot_pkg'

    package_path = os.path.join(
        get_package_share_directory(package_name))
    xacro_file = os.path.join(package_path,
                              'urdf/',
                              'my_mobile_robot_simple.xacro')

    doc = xacro.parse(open(xacro_file))
    xacro.process_doc(doc)
    my_mobile_robot_description = doc.toxml()
    params = {'robot_description': my_mobile_robot_description, 'use_sim_time': True}

    node_robot_state_publisher = Node(
        package='robot_state_publisher',
        executable='robot_state_publisher',
        output='screen',
        parameters=[params]
    )

    node_joint_state_publisher_gui = Node(
        package='joint_state_publisher_gui',
        executable='joint_state_publisher_gui',
        name='joint_state_publisher_gui'
    )

    node_tf = Node(package = "tf2_ros",
                       executable = "static_transform_publisher",
                       arguments = ["0", "0", "0", "0", "0", "0", "map", "base_link"])

    node_rviz = Node(
        package='rviz2',
        namespace='',
        executable='rviz2',
        name='rviz2',
        arguments=['-d' + os.path.join(get_package_share_directory(package_name), 'config', 'config.rviz')]
    )

    return LaunchDescription([
        node_robot_state_publisher,
        node_joint_state_publisher_gui,
        node_tf,
        node_rviz
    ])
Don’t forget to add the new folders in setup.py
import os ## Add-1
from glob import glob  ## Add-2
...
data_files=[
        ('share/ament_index/resource_index/packages',
            ['resource/' + package_name]),
        ('share/' + package_name, ['package.xml']),
        ## Add these
        (os.path.join('share', package_name, 'launch'), glob(os.path.join('launch', '*.launch.py'))),
        (os.path.join('share', package_name, 'urdf'), glob(os.path.join('urdf', '*.xacro'))),
        (os.path.join('share', package_name, 'config'), glob(os.path.join('config', '*.yaml'))),
    ],
...
We are ready to run. Run these in your ~/ros2_ws directory.
colcon build
source install/setup.bash
ros2 launch  my_robot_pkg my_mobile_robot.launch.py
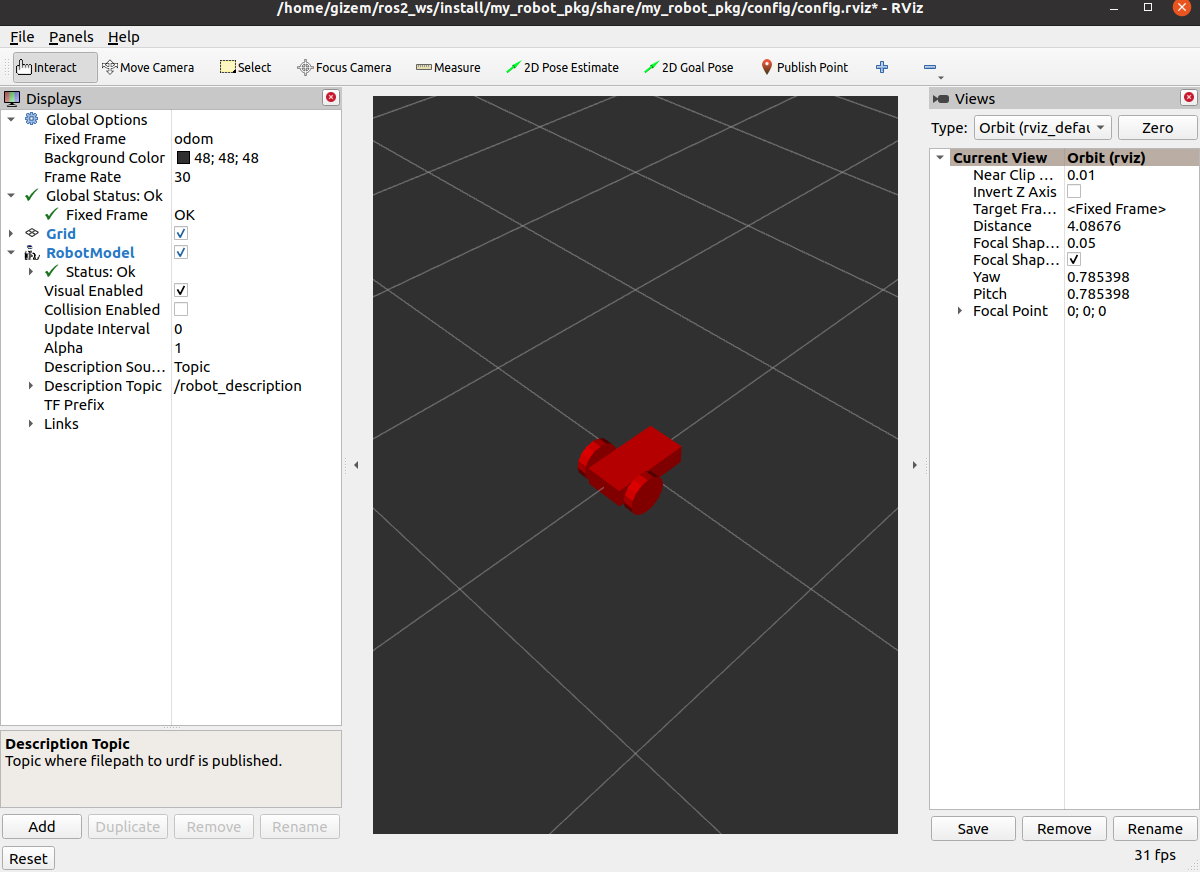
You will see Rviz started but you are not seeing any robots on the screen yet. There are 3 things we need to set on the left toolbox.
- Add RobotModel at the bottom left.
- Change the RobotModel description topic to /robot_description
You should be able to see the robot now.
If you press Ctrl + S, it will save these settings.
Observing TF
Go to the left toolbox and add TF.
Change the model link features; show axes, adjust the opacity (alpha)
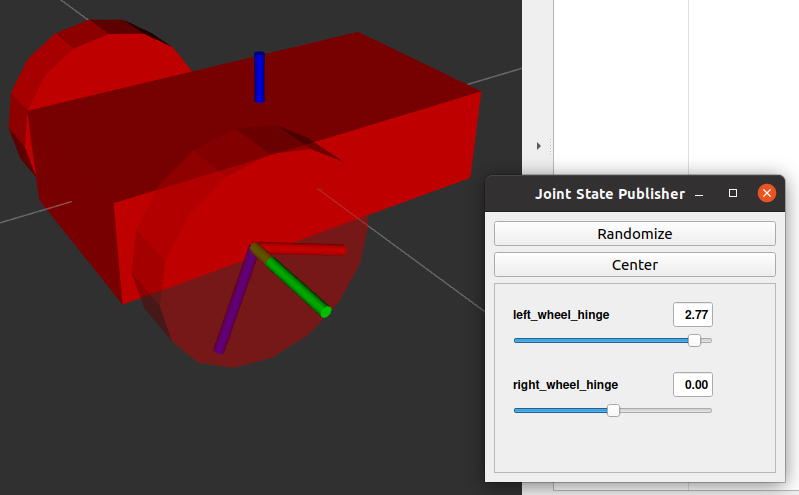
Play around the Joint State Publisher